You may have wondered what is an XMP file and – more importantly – how it works. Sometimes this can be hard to understand, so we’re here to clear the fog.
An XMP file is a compressed container for metadata supported by apps such as Adobe Photoshop, Lightroom, and others. But that’s a little vague, so let’s get more specific!

What is an XMP File?
XMP stands for Extensible Metadata Platform. An XMP file (also called a sidecar file) preserves any additional metadata applied to that file. This allows the information to be stored separately and stay intact between devices.
To exemplify: in an image editing app, the edits you make are applied to a RAW file (the image that comes directly from your camera). These edits are stored in a separate sidecar file or inside a catalog (e.g., Lightroom catalog).
Lightroom can only store editing info in a catalog or XML file because it doesn’t have access to proprietary RAW files.
In a nutshell:
An XMP file is a metadata file that stores the settings you applied to a photo in apps like Adobe Lightroom or Photoshop. This information inside an XMP file includes:
- EXIF information – camera settings (exposure info like aperture, iso, and shutter speed), time, date, and keywords that describe the file.
- Edit information – adjustments made to exposure, white balance, and color saturation, as well as any other changes you made to the photo’s appearance
XMP files can be edited more easily – that is, without changing the original file. They’re ideal when you want to preserve your edits, like when you collaborate with other photographers and want to send a sidecar file, so they see the changes you made to an image.

This data is usually embedded in certain files, such as open format images like JPEG, PNG, GIF, and TIFF.
I Do Not See XMP Files in My Library
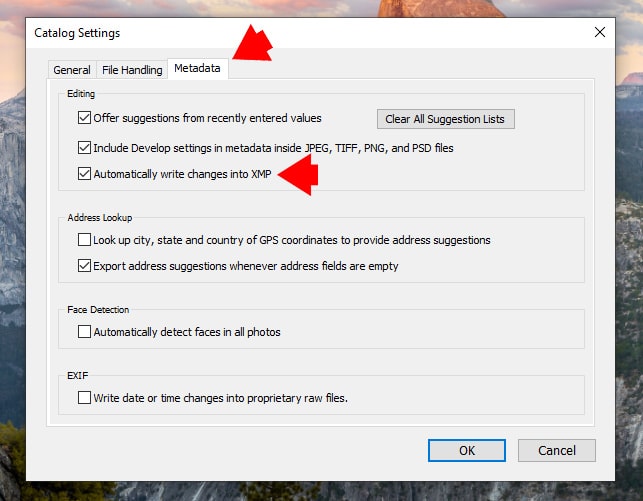
By default, Lightroom embeds XMP information inside Lightroom Catalog without generating XMP sidecar files. If that’s the case, you need to enable this function in Catalog Settings.
How to enable XMP sidecar files in Lightroom:
- In the top toolbar, you can see the tab Edit (“Lightroom Classic” on Mac) – click on it
- From the dropdown menu, select the “Catalog Settings” option
- Click on the “Metadata” tab
- Check the “Automatically write changes into XMP” box

If you want to disable this feature, go back to “Catalog Settings” and uncheck “Automatically write changes into XMP.”
If you’re working with RAW files and have this function turned on, Lightroom will automatically write editing instructions to the .xmp file each time you edit the selected image – that means it will do that at every slider you move in Lightroom.
Using XMP sidecar files is good if you want to preserve your editing info in case your catalog gets corrupted. Also, XMP files take up very little space on your hard drive. However, it slows down Lightroom!
Ultimately, it’s up to you to choose which option works best for you.
XMP Files and Lightroom Develop Presets
Before, Lightroom had limited editing capacity and only allowed for RAW file managing. The Lightroom Develop Preset aimed to make editing as accessible as possible, enabling non-destructive editing.
What is Non-destructive Editing?
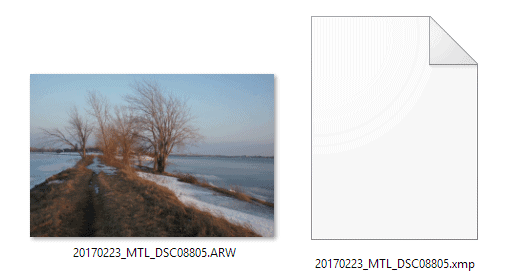
You’ll see a bunch of RAW and XMP files with the same name piled together on your hard drive. RAW files are taken from your camera – they have no data attached to them. XMP files are metadata files: the information stored in them includes EXIF data and any editing you might have done in apps like Lightroom.
When editing RAW files In Lightroom, all the changes are saved in the XMP file. For example, if you move a slider in Lightroom, you can see the edits you made with that slider in the sidecar file (the XMP file). So if you read it in a text editor, you’ll see those edits you made presented as editing instructions.

As you see, you can edit any image by changing the values inside the XMP sidecar and without touching Lightroom sliders. Of course, it would not be practical.
All these edits you make are transformed into a JPEG preview with all the changes in the app. The RAW file remains unaltered this whole time.
Sidecar vs Preset
When you want to save edits applied to the selected image as a preset, Lightroom takes all editing instructions from sidecar and saves them as Develop Preset using the XMP file format.
In a nutshell, the Lightroom develop preset is the same XMP sidecar file with a different function.
When you apply the develop preset to the image, the editing instructions will be copied from the preset in XMP format to the sidecar XMP file; Lightroom then reads this file and generates a preview with all these values.
Having a sidecar file allows edits to be shared between apps. For example, you can start editing an image in Lightroom, continue in Photoshop, and send it over the cloud in Lightroom Mobile – without losing any editing data.
How to Open XMP Files in Lightroom?
There is no way to open the XMP file in Lightroom. The program manages all XMP files automatically without you having to do anything.
But you can open the XMP file outside Lightroom.
If you want to see or change the information inside an XMP file, you can open it using a text editor:
- Go to a text editor, like Notepad++
- View or edit the XMP file as a text file

*You can use text editors if you want to duplicate presets, as Lightroom doesn’t have this feature. Just duplicate the preset in the file browser and change the name inside the XMP file so Lightroom can see it.
Generating XMP Files on Demand
If you want to share a RAW file with all the edits, you can include a sidecar file next to it. You also might not want Lightroom slowing things down by writing .xmp files every time – maybe you want to leave this choice to you.
How to create one XMP file:
Edit your photo and hit the “Ctrl-S” (Command-S on Mac) keyboard shortcut. Lightroom will create a separate .xmp sidecar file with all your changes.
Alternative to XMP files:
There is also a way around this. You can create a DNG file, so you don’t have to send both an XMP and a RAW file – all the information will be embedded in this one DNG file.
How to convert a photo do DNG file format:
- Go to the Library module.
- Below the Library menu in the upper toolbar, select ‘Convert Photo to DNG.’
Ultimately, you can export a photo as a DNG image, and all XMP information will be embedded inside the DNG image.
What is an XMP File? | Final Thoughts
At its most basic level, an XMP file is a sidecar file containing additional information about an image. But as we’ve seen, there’s much more to XMP files than meets the eye.
Now that you know everything about XMP files, it’s up to you to decide if you want to use them continuously in your editing workflow or just every once in a while.

