

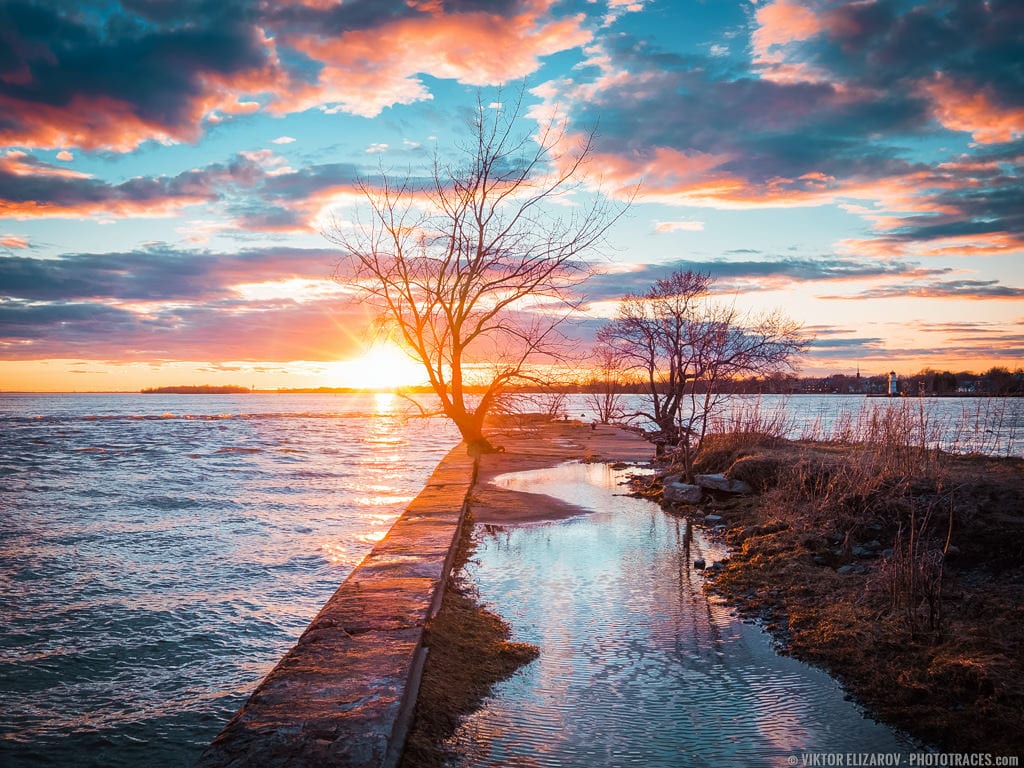
I had only one goal in mind when I decided to shoot sunset in the local park in the vicinity of Montreal. I wanted to put the X-Trans sensor of my new Fujifilm XT2 camera to the test and take it to the limit. I tried to estimate the dynamic range of the sensor, shooting directly into setting sun.
After years of shooing bracketed exposures for HDR with Canon and Sony cameras, I could see that the new Fujifilm X-Trans sensor was more capable. I wanted to test if it was possible to avoid HDR all together to make my workflow simpler.
The Fujifilm XT2 performed splendidly. I managed to capture the sunset scene shooting directly into the sun without clipping highlights or shadows. All I needed is one shot only.
But by the end of the day, I managed to achieve two more goals I was unaware of at the beginning of my shoot.
After the rain, it was very windy, and I could see the potential to achieve an exciting composition by incorporating the reflections of the scene in breezy water. I intentionally did not use a tripod, avoiding long exposures. I wanted to freeze the motion of the breezy water. Producing an interesting composition became my second goal.
And finally, when I saw the cloud formations and its colors, I recognized it would be a perfect opportunity to take the Range Mask tool in Lightroom to its full extend. I used one Range Mask to highlights the red areas of the sky and another Range Mask to enhance the blue regions. It was goal #3
Shooting
The shooting itself was uncomplicated. I was shooting handheld in a single shooting mode without bracketing.
The challenge was to come up with an interesting composition because the space on the old pier was minimal, and I could not perfectly align the sun, two trees, and the lighthouse in the background. But I did my best.
Camera: Fujifilm X-T2
Lens: Fujinon 10-24mm
Focal Length: 22m (Hyperfocal distance: 3m)
Shooting Mode: Aperture Priority (A)
ISO: 200
Aperture: F/8
Shutter Speed: 1/110s
Tripod: handheld
Editing & Processing
It was a single RAW processing workflow.
Lightroom (80%)
My first goal was to improve the composition. I used the Crop Overy tool to make composition tighter. Next, I change the original aspect ratio 3 x2 to 4 x 3.
I used the Napa preset from my Travel Pro Kit Collection (coming soon) as the base for Lightroom Rapid Editing. Then I used TOOLKIT to boost the Exposure and open Shadows.
The Lightroom Preset Editing Formula: Napa (1, 8, 23, 32)
I created 2 Graduated Filters, one for the red highlights of the sky and another for the blues of the sky. I applied the Rnage Masks on each Graduated filter to maximize selective targeting.
You can learn more about advanced use of the Range Masks in my extensive tutorial here: Lightroom Range Mask: Advanced Luminosity and Color Masking in Lightroom
Photoshop (20%)
In Photoshop, I cleaned up the image by removing debris in the foreground with the help of the Stamp Tool. At the very end, I reduced the digital noise. I used the Topaz DeNoise plugin.
Total time: 20min
Before & After Transformation
