

This article is a logical extension of my initial attempt to answer one of the most common questions I receive from the PhotoTraces community: What is the best Lightroom alternative?
I created a simple quiz where, after answering a series of simple questions about your photography, you will receive a few of my recommendations. Today, I want to go deeper by reviewing one of the top Lightroom contenders: Exposure X5.

What is Exposure X5?
Exposure X5 is a full-featured professional digital asset management (DAM) and RAW editing program created by Exposure Software, formerly known as Alien Skin.
I find it amusing that a company with a distinctive and fun name like Alien Skin transitioned into a such a boring and faceless corporate name and logo.
Exposure X5 is positioned in direct competition with Lightroom.
When Apple discontinued
Aperture in 2014, Lightroom became the main player in the realm of RAW editors
by not only capturing a segment of the professional photography market but
attracting amateur photographers and even the occasional hobbyists as well.
Today, newcomers trying to compete with the biggest name in the industry face a
tough, uphill battle.
There are two ways that companies try to compete with Adobe. The first strategy is to create a program that is drastically different from Lightroom by using unique tools and workflows. The best example of this strategy is seen in Capture One.
The second strategy is to create a RAW editor similar to Lightroom that addresses the main shortcomings of the program. The top contenders in this category are On1 Photo RAW and Exposure X5.
If you are a Lightroom user and want to try Exposure X5, the learning curve is minimal because Exposure X5 mimics Lightroom in many ways.

The layout of the program, name of the editing panels, and even the organization of the editing sliders is very similar to Lightroom. They took the best features of Lightroom, the features photographers liked and utilized the most, and either fixed or removed the annoyances or features photographers hated in Lightroom.
Addressing Lightroom Shortcomings
1. Speed and
Overall Performance
As a Lightroom user who started using the
program when it was in its beta state, my biggest critique of the program is
its sluggish performance. It is slow.
On the other hand, Exposure X5 is one of the fastest RAW editors around.
Earlier this year when I worked on the Lightroom Alternative Quiz, I downloaded and installed 12 different RAW editors to compare them to Lightroom. Out of all the programs, Lightroom was the slowest and Exposure X5 was, by far, the fastest and most responsive. The program never slows down even after hours of work or being open for 24 hours or longer.
It simply flies.
2. Eliminating the Complexity of the
Import Process
As an educator, the most
difficult part of teaching Lightroom is explaining to new users why they cannot
navigate to any folder on their computer, select a photo, and begin editing.
Instead, they have to go through the import process, which is the most
confusing and complex part of the program.
The import module scares
the hell out of new photographers.
Exposure X5 addresses this issue by eliminating the import process. To start editing, just add a folder with the images to the program as a shortcut and you are ready to go.

Instead of spending
hours importing a large number of photos in Lightroom, which makes it
impossible to use your computer because the program uses 100% of the CPU, it
only takes a few minutes to get started with Exposure X5. You can even work
while the program processes new photos!
3. Layers Support
As a lifelong Photoshop
user, I believe that the concept of layers is what made the program so
powerful. I’ve been waiting almost a decade for Adobe to add layers to
Lightroom… and I am still waiting.
In Exposure X5, you can have multiple layers that do not slow down the program but make the complex editing process so much more organized and streamlined. I can have all my gradients, brush adjustments, and healing adjustments on separate layers that I can turn on and off individually in Exposure X5. Plus, I can create a unique mask for each layer.

I really like the
Photoshop-like editing workflow. It is more logical and simpler.
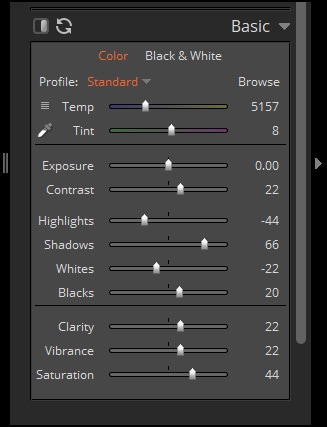
4. Opacity
The opacity function is another feature missing in Lightroom. Opacity is the ability to dial down any editing effect, which is the cornerstone of graphic design and photo editing. To mimic the opacity functionality in Lightroom, I created a series of develop presets with various strengths ranging from 100% to 50%
In Exposure X5, you can adjust the opacity nearly everywhere.
First, you have the Overall Opacity slider on
the top right of the editing panel. This allows you to dial down the overall
editing effect.

Second, each layer has
its own dedicated Opacity slider. The ability to adjust the opacity of the
individual layer is probably the most useful feature of the program.
5. Streamlined UI Design
Another issue that drives me insane in Lightroom is the multi-module structure. There are certain things that I can do only in the Library module or only in the Develop module. This means that I have to switch from module to module upwards of 100 times a day. Did I mention that this drives me crazy?
I always dreamed of a
single module interface where I could customize the UI according to my needs.
Guess what? Exposure X5 made my dream come true. The program uses a single module interface. The Metadata panel is positioned at the bottom right of the editing panel and the Folders panel is permanently featured on the left panel. There is no jumping from module to module.
Plus, I can customize
and reposition the different panels however I want!

6. You are not Forced into a Subscription
Model
Exposure X5 does not
have a subscription model. You can buy a perpetual license for a one-time fee.
I do not have an issue
with the Adobe Creative Cloud subscription model because, for $10 per month, I
receive a lot of value. At the same time, I hate not having the ability to
opt-out of the subscription. You feel like you’ve been trapped.
For people who only use the editing program occasionally, it does not make sense to pay a monthly fee for a program they do not use. Exposure X5 is a great alternative if you want to ditch the Adobe subscription-based model.
You can get Exposure X4 for $119 (upgrade price $89), or you can download a free 30 day trial. There’s no subscription fee. Learn more here.
Unique Features and Tools of
Exposure X5
Presets Panel
Alien Skin originally developed plugins for Photoshop that emulated film. They had simulations for hundreds of different film brands and models, the ones you could further customize.
They transitioned all these simulations to Exposure X5 in the form of presets. The program comes with nearly 300 presets that are organized into 29 collections.
Exposure X5 has
different types of preset collections: film simulations, artistic, adjustment
presets, and even Fujifilm simulations.

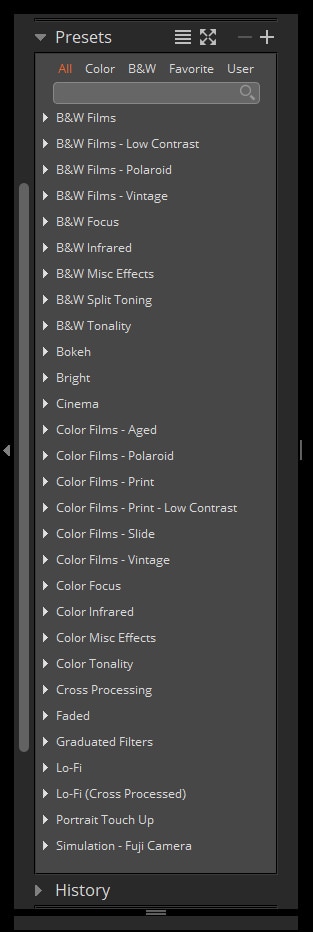
What is closest to my
heart is that Exposure X5 has the most advanced and well thought out Presets
Panel.
It has four different
views: list view, big thumb view, medium thumb view, and small thumb view. This
means that, regardless of your workflow, you can adopt a Preset Panel that
matches your specific needs.
I always use the list
view. I have my Style and Adjustment preset collections open so that when I
move the mouse over any individual preset, the selected photo displays the
effect in real-time. It is fast and responsive.
Overlays Panel
The Overlay Panel allows us to apply visual
effects to an image in the form of borders, light effects, and textures (dust,
scratches).
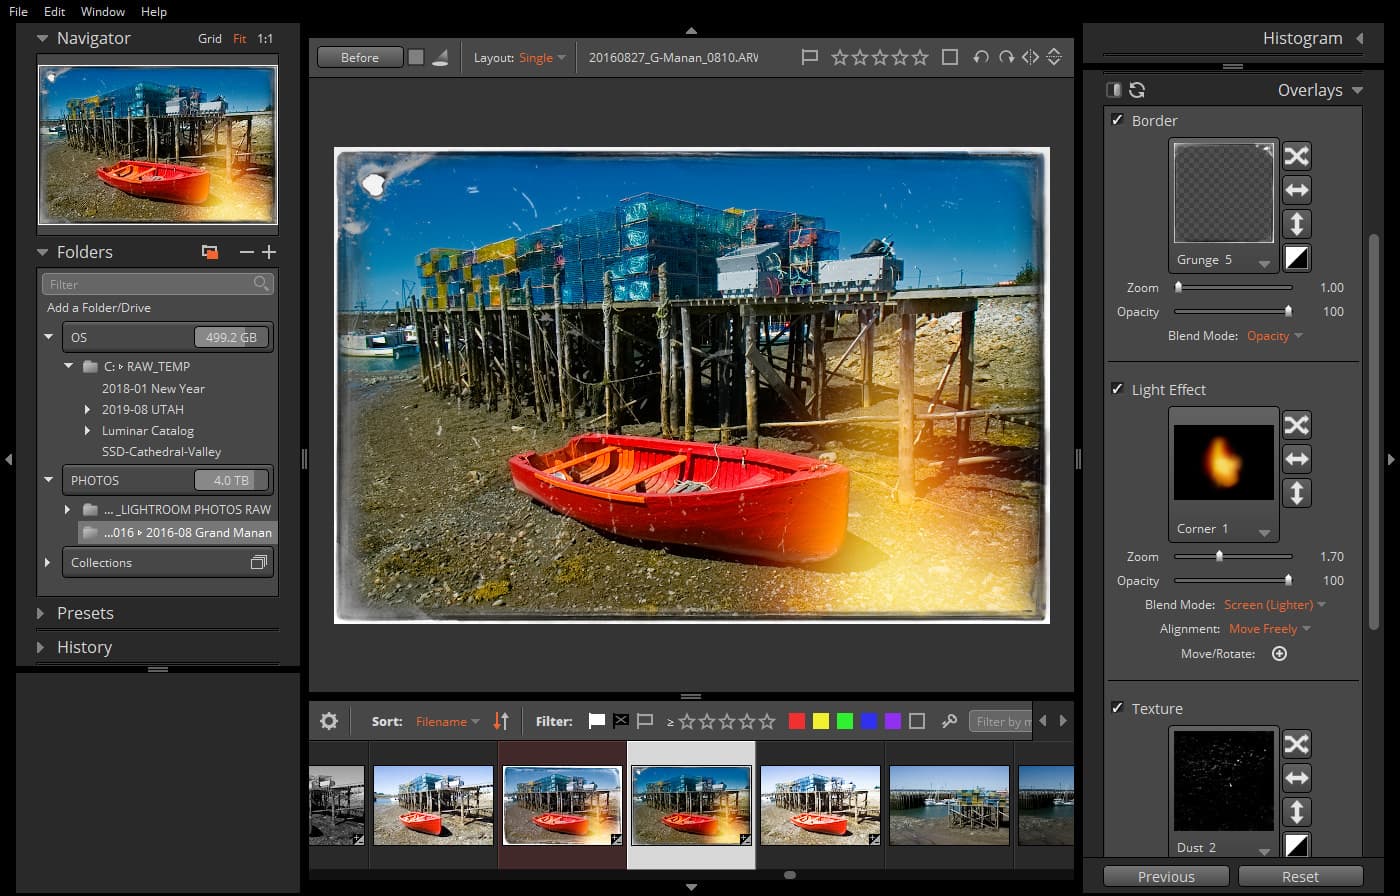
The Overlay Panel offers plenty of
preinstalled presets that you can further customize.
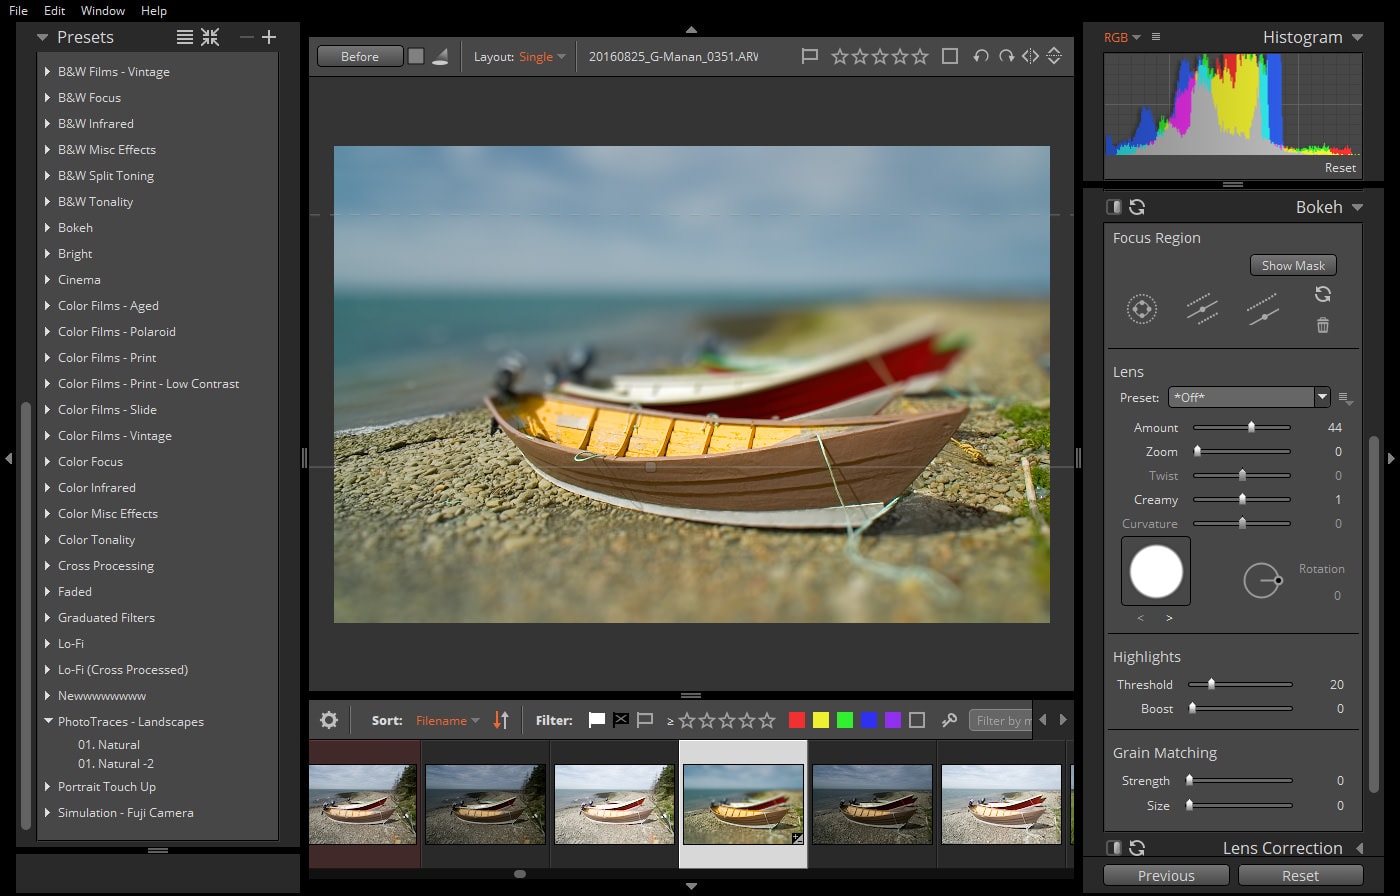
Bokeh Panel
The Bokeh Panel offers some advanced controls
to creatively use the blur effect.
For example, you can use a circular blur with
portraits and a plane blur with landscapes and cityscapes to create a miniature
effect.
IR (Infrared)
Panel
For photographers who
want to explore infrared (IR) photography, Exposure X5 offers a dedicated IR
Panel.
Lens
Correction and Defringe Panels
My biggest complaint about the previous version of Exposure X4 was the lack of tools available to remove chromatic aberration.
At this point, I shoot
with high-quality Fujifilm lenses and chromatic aberration is less of an issue.
But when I open my older photos from my Canon and Sony days when I shot with
lower quality lenses, chromatic aberration has to be addressed. Since the
previous version of Exposure X5 did not have defringe tools, I had to jump to
another application.

In Exposure X5, the
company introduced the most advanced defringe tool I have ever encountered. In
total, there are three levels to deal with chromatic aberration:
- Profile Correction. The program automatically tries to fix the chromatic aberration based on the lens profile.
- Manual Correction. You have the option to separately remove blue and red fringing.
- Defringe Panel. Finally, if the previous two steps are not enough to eliminate chromatic aberration, you have a dedicated panel where you can control the fringing by any color.

Advanced
Masking
My favorite and probably the most powerful addition to Exposure X5 is advanced masking.
Let me explain.
I am a big proponent of the luminosity masking technique in Photoshop. I use a dedicated luminosity masking panel in Photoshop called Raya Pro, which was created by travel photographer Jimmy McIntyre. I highly suggest checking out McIntyre’s work if you are interested in learning more advanced Photoshop techniques.
Now, with the addition of advanced masking (found under the Color Constraints Panel) in Exposure X5, I have a more powerful tool than luminosity masking in Photoshop.

It is hard to believe that I can create complex masks based on Luminance, Saturation, and Hue in a nondestructive RAW environment.
Plus, I can create
different advanced masks for every layer individually and I am not limited to
what tools I can use.
Priceless.
Negatives
To be honest, there are not many negatives.
The only complaint I have is that the UI design looks outdated like it was
created 20 years ago.
It is possible that, as a former graphic
designer and UI designer, I am too picky.
Shortcomings
For my digital workflow, the biggest
shortcomings in Exposure X5 are the lack of built-in Panorama and HDR tools.
Adobe spoiled us with the possibility of
creating panoramas and HDR images without leaving the RAW editing workflow and
without the need for dedicated HDR and panorama programs.
I often use a standard lens to create wide-angle images. I take four to six shots and combine them into a wide-angle panorama during the editing process. I use panorama tools often.
I do not want to go back
to the old days when you had to rasterize RAW images to create a panorama
photo.
I hope that the future
version of Exposure X5 includes a Panorama module.
Will I Use Exposure X5?
There is no way that I can completely ditch Adobe because I am too invested. Like the old Russian joke goes, “There is no escape from a submarine.” For now, I will stay in the Adobe submarine, but I will keep a close eye to see if it goes up or down.
Because I really like Exposure X5, I decided to use it when I am on the road. It runs extremely fast on my laptop and even on my Microsoft Surface Pro tablet. It also saves battery because there is no import process.
Who is Exposure X5 for?
- If you are a beginner and are looking for your first professional photo organizing and editing tool, Exposure X5 should be your first option.
- If you are trying to ditch the Adobe Creative Cloud subscription model, Exposure X5 is a perfect alternative.
- If you are a professional photographer, I encourage you to download a trial version of Exposure X5 to see if it addresses every aspect of your specific digital photography workflow.
Take Exposure X5 for a Test Drive
You can get Exposure X4 for $119 (upgrade price $89), or you can download a free 30 day trial. There’s no subscription fee. Learn more here.