

Have you ever wondered why sometimes your photos
look pixelated? It’s like there are grains in the images and the colors are
somehow dull. The photos look a bit fuzzy. This often makes you wonder, “Why are my photos grainy?”.
You know that you took the right shot, chose the
best angle, and even did your best to compose the scene. Still, the photos come
out lacking in vibrancy and color. And they look dirty. This is what grainy
photos are like.
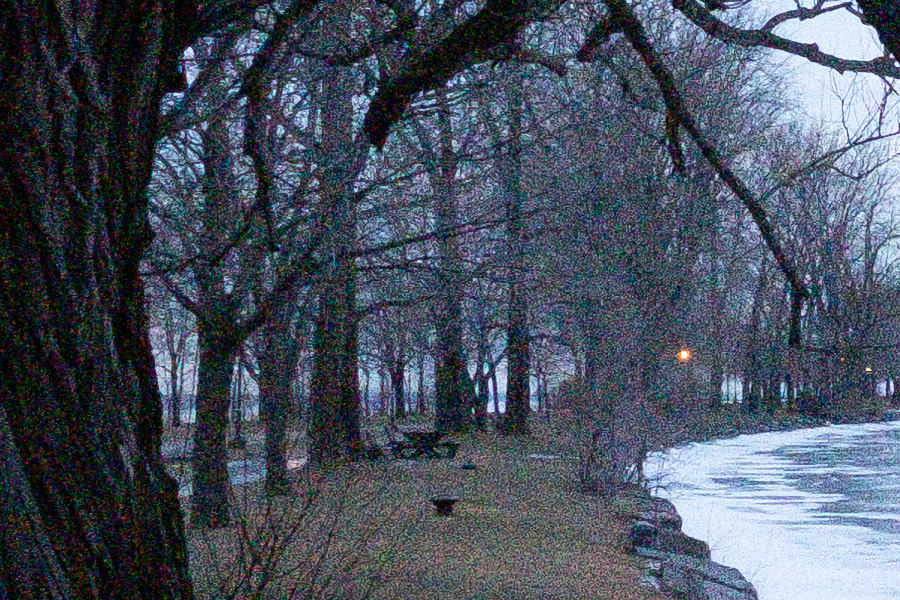
Grain is described as a visual distortion of sorts because of the tiny specks or flecks, or pixels, you see in your photos. These “uncooperative” pixels can be of different amounts or texture and do not represent the correct exposure and color of the image. In other words, the photo is distorted and some of its details are obscured.
The best way to imagine grain would be to visualize
small circles that appear in a picture.
Grain vs. Noise
Grain and noise are often used interchangeably or
in similar context. The term grain is more commonly used in film photography.
In digital photography, photographers refer to it as noise.
Digital noise is similar to sound distortion or disruption. When you are recording something – such as a song – you hear some kind of a hiss when you listen to it afterwards. This is what you call noise. So, in photography, when there is digital noise, your photos’ colors and brightness will be altered. The degree of luminance is also affected.
Related: Choosing the Right Coating for Your Photos
It is also important to note that noise appears in shadows. You can only see it once you increase the brightness of a photo. These look like color blotches or bands. Grain, on the other hand, appears in highlights.
While film grain in analog photography is quite
popular and is often accepted, digital noise is not something photographers
want to deal with.
Anatomy of a Digital Noise
Have you tried taking a photo at night or in low-light condition? If you brighten up the photo, you might have seen some specks of discolored pixels. This is what digital noise is all about. The more you brighten the image, the “uglier” and noisier it will become.
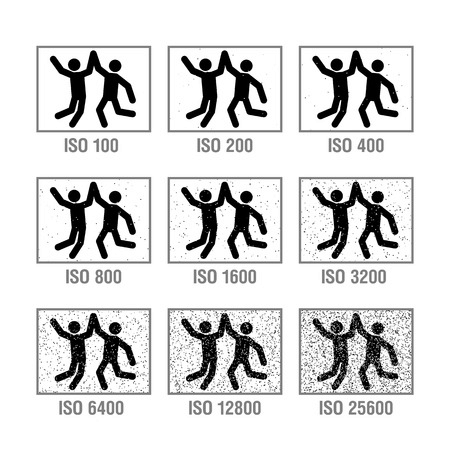
To properly understand digital noise, it is also important to understand ISO and its role in creating this visual disruption.
ISO is expressed in numbers that signify the film’s sensitivity to light. The lower the ISO number is, the lesser the sensitivity level. As the ISO increases, light sensitivity also increases. In terms of noise, the higher the ISO level, the more noise there will be in your photos.
Related: Why are my pictures blurry?
In digital photography, however, ISO does not necessarily convert to sensor sensitivity. Rather, it is more connected with gain – or applied gain.
Let me explain.
For example, if you take a photo with ISO set to value of 200, the image is still recorded at a base ISO of 100. When the image is recorded, the gain is applied to boost the brightness by a factor of two.
This is when the image gets affected and its details and sharpness are distorted and digital noise also increases.
Why Are My Photos Grainy?
As previously mentioned, when you set your ISO to high levels, your photos will come out grainy. So, the higher the ISO, the grainier or noisier your image will become. This normally happens when your ISO is set to 1600 or higher.
Constantly remind yourself that the lower the ISO
number, the less grain your images will have.
How to Avoid Grainy Photos
If your photos are noisy or grainy, all is not
lost. The first thing you need to do is try to find out what led to that
outcome. This will then help you determine what you should do next.
There are three things you can do to prevent your
photos from becoming grainy.
1. Go for Lower ISO
The most obvious thing you can do is lower your ISO when you shoot.
But there is another way to work on your ISO. You would need to focus on your aperture and shutter speed. Before adjusting your ISO setting, open up aperture first. The lower the f-number, the better. On most quality prime lenses, the lowest aperture is f1.2 to f1.8.
For more information on the topic of exposure, please read the article: Exposure Triangle: making sense of aperture, shutter speed & ISO
If you want more light to get in, adjust your shutter speed by slowing it down. If you don’t have a tripod and your camera/lens does not have the IS (image stabilization) feature, don’t go below 1/50th of a second.
By opening the aperture and slowing the shutter speed will allow you to use lower ISO values and as the result reduce noise in your photos.
2. Overexpose Your Photo A Little Bit
This might be difficult to master but it really works.
Don’t look at your camera’s screen. Use your histogram, instead. The level should spike a little bit to the right. It would be better if you use manual mode. Since noise appears in shadows or in dark areas, it will decrease if the photo is slightly overexposed.
Underexposing the photo, on the other hand, will increase noise.
3. Use a Camera with Better Low Light Performance
Use a camera with better low light performance. These gear are intended to specifically capture as much light as possible in low light situations. They are equipped with features like high quality light-capturing sensors and image processors ideal for low light photography.
How to Fix Grainy Photos
In case you’ve already taken photos that came out grainy, there’s still hope. You can still have your grainy photos fixed.
Related: Depth of Field (DOF) in Photography
Removing Digital Noise in Lightroom
While there are some cameras that come with a noise reduction feature, most photographers prefer to use post-processing software like Lightroom. Its Noise Reduction section of the Detail Panel will allow you to reduce luminance noise and color noise separately.


Be aware, though, that using a noise removal tool can lead to loss of some details in your photo.
Related articles: Night Photography Settings
Removing Digital Noise in Topaz DeNoise
In cases when the digital noise in your photos is extreme you will need something more powerful than Lightroom. This is when you need a Noise Reduction Program like Topaz Labs’ DeNoise. This is a dedicated noise reduction program that can be used for severe noise or grain problems. It is an all-in-one noise reduction program so you don’t have to use separate applications to reduce noise and then fix the sharpness of the affected areas.
Conclusion
Some photographers may think that grain in your photos is all right. Generally, however, digital noise is considered a big turn-off, and even your viewers know this – they just don’t know the correct term for it. While it may sound like a highly technical problem, there are simple solutions that can help you fix it.