

If you are looking for top Lightroom workflow tips to optimize and speed up your editing process, you need to read this article.
What is Lightroom Workflow?
Lightroom workflow is a series of steps you need to complete, from the moment you capture the RAW image with your camera to publishing the final photo. The Lightroom workflow steps include importing images, culling, keywording, processing, editing, and finally, exporting and publishing.
Lightroom Workflow Tips
Lightroom has been around for almost 20 years and is now a mature and sophisticated program. You could easily write an 800-page book dedicated exclusively to Lightroom workflow tips and tricks.
I selected 15 of my favorite Lightroom workflow tips for today’s article. These tips are the most impactful to my photography and my business, and they are ones that I use daily.
1. Speeding up Lightroom Classic Performance
Lightroom is the single, most important application for many photographers, including myself. It is the center of not only our editing workflows but our photography businesses as well.
We use Lightroom for organizing, editing, publishing, and printing photos. Plus, it can be connected to various services with the help of plugins.
Our biggest annoyance with Lightroom Classic is its slow performance and lagging responsiveness.
I am always critical of Adobe, a company with the greatest resources in the industry, for failing to address the performance issue after years of empty promises.
Since we cannot rely on Adobe, we are forced to look for solutions by testing different configurations and sharing our findings.
A couple of years ago, I published a dedicated article on the topic. Even though most of the tips from the article are still relevant, all the improvements are marginal. They might help you increase Lightroom’s performance by 1% to 2% at most, but this is only a drop in the bucket.
Today, I will share my top tip for improving Lightroom performance by a factor of at least two.
For me, the most dramatic change in Lightroom Classic user experience occurred when I changed my desktop computer’s main hard drive from an old, mechanical spinning drive to a new generation Solid State Drive (SSD). The SSD uses technology similar to what you will find in any flash thumb drive and, as a result, is much faster and more reliable.
See also: How to Change Lightroom Catalog Location
The main challenge with an SSD is that the technology is still relatively new and SSDs are more expensive than the old spinning internal or external hard drives. This means that I cannot afford to buy the 8TB SSD version to store my entire photo library.
When Lightroom is installed on a fast SSD drive but still has access to the RAW files on a spinning hard drive, the effectiveness of the SSD setup diminishes.
Here is my solution.
When I return from a trip with thousands of new photos, I create a temporary directory on my 1TB SSD drive and import all the new photos there. This means that I can fully enjoy the SSD experience and its blistering speed. I keep the new photos in the temp directory until I am done processing and editing them. This might take weeks or even months. Once I am finished, I move them into the main library on the 8TB spinning drive.

I recommend the EVO Samsung SSD models because they have the best migration software. This allows seamless migration from the old drive without reinstalling the operating system. Also, it does not require technical knowledge. I’ve done this successfully twice.
2. Use AUTO Tone Mode
AUTO Tone is probably the most obscure and least used feature in Lightroom. You can find it in the Develop Mode under the Basic Panel. By pressing the AUTO button, you let Lightroom decide what exact edits to apply to the selected image.
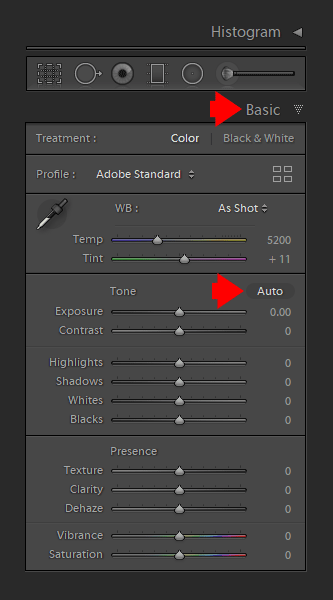
AUTO Tone was available in Lightroom for a long time and was pretty much a useless feature that produced unpredictable results. But, with the advances in Artificial Intelligence and Machine Learning, AUTO Tone is getting better and better at evaluating images and applying the appropriate edits.
Do not disregard AUTO Tone. Try it with every image because, in most cases, it will give you a great starting point for your editing process.
If you want to take this even further, create a Develop Preset with only the AUTO Tone edit recorded. Apply it to all your photos during the import process to give every new photo a unique editing baseline.
Resources:
3. Use Selective Saturation
When we shoot JPEG, the camera takes the data collected from the sensor and runs it through the camera processor. The processor converts the raw data to the image, applies different edits, including saturation and contrast, based on predefined algorithms, and saves the image as a JPEG file. When we shoot RAW, it is up to the photographer to decide what edits to apply to any specific image.
One of the most important decisions we have to make is how to properly address image saturation.
You probably noticed that saturation could make or break your image. When applied properly, it can bring any image to life. But, at the same time, it is also very easy to destroy a photo with oversaturation.
Every Lightroom user knows the two main tools to control saturation in photos—Saturation and Vibrance, which are located under the Basic Panel.
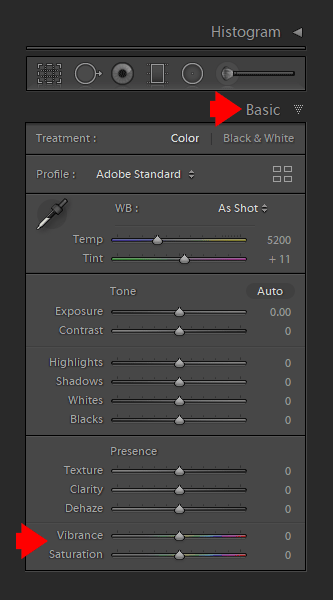
The Saturation slider equally increases the color intensity to all the colors. The Vibrance tool applies saturation disproportionally, prioritizing colors with lower intensity.
When you use the Saturation, the Vibrance, or a combination of both, you end up with a photo where all the colors have boosted saturation. It is difficult to emphasize one specific color or group of colors for a better visual impact.
To have better control over color saturation, I use a different approach. I use the HSL (Hue, Saturation, Luminance) panel. This panel allows me to selectively control the saturation for every image color.
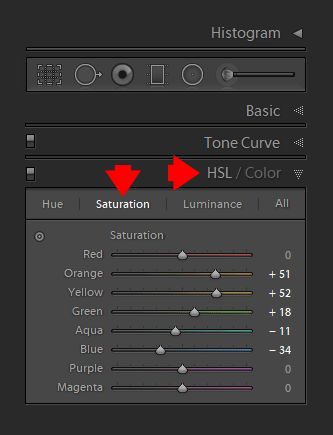
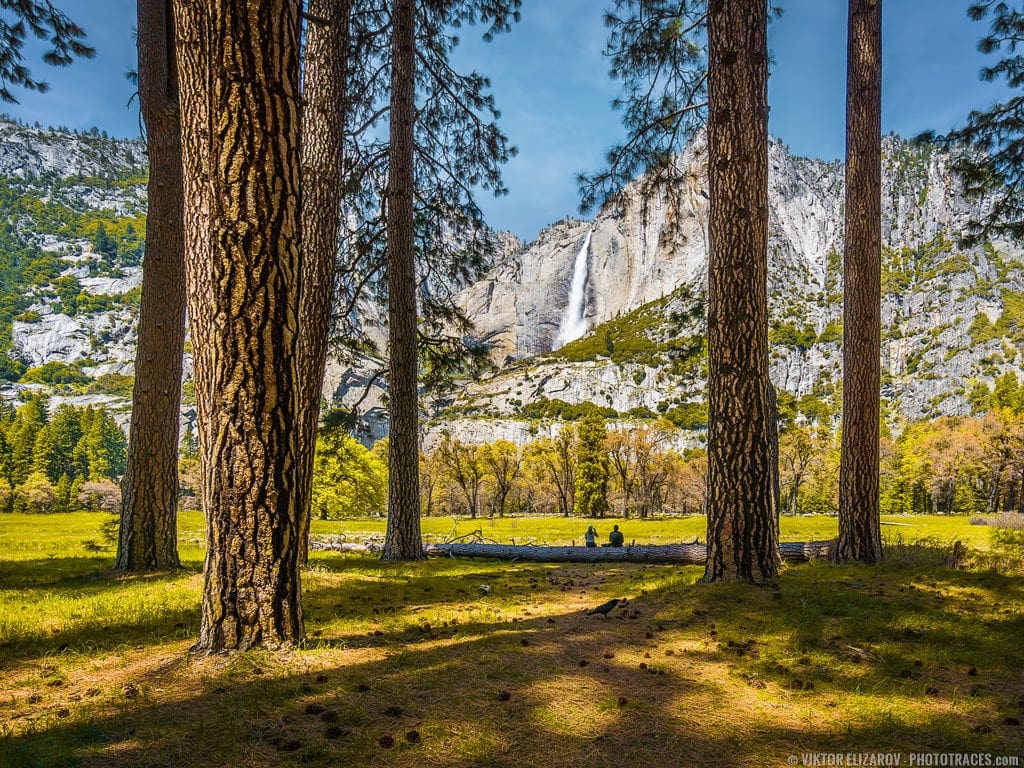
For example, if I want to emphasize the vegetation in my landscape photo, I boost the saturation of only the yellows and greens. I might even reduce the saturation of the sky (blue color) to make it easier to draw the viewer’s attention.
4. Maximize the Tonal Range in Your Photos
Maximizing the tonal range means using the entire range of tones from pure black to pure white.
For example, when you take a photo on an overcast and gloomy day, the photo will have a limited tonal range of mostly greys without very dark or bright tones.
We can maximize the tonal range of any given photo by setting the black and white points.
Lightroom has built-in functionality for setting black and white points. This is a semi-automated process.
Open the Basic Panel of the Develop Module.
Hold down the SHIFT key and double-click the Whites label on the left side of the editing slider. Lightroom will automatically set the White Point by setting the Whites value to a maximum value that does not introduce pure white.
Next, hold down the SHIFT key and double-click the Black label. Lightroom will automatically set the Black Point by setting the Black value to a minimum without clipping it (introducing pure black).

The result is an image with a full tonal range.
If you want to learn how to use this simple technique when editing landscape photos, check out the following tutorial: How to Set Black and White Points in Lightroom
5. Use the Smart Contrast Technique
Contrast is another important technique that we apply to nearly every image we edit. Properly applied Contrast makes the image pop and creates a higher visual impact.
In Lightroom, there is a dedicated Contrast Slider in the Basic Panel. The way the Contrast functionality works is that it makes darker colors darker and brighter colors brighter by creating a higher tonal contrast between the dark and bright areas of the image.
But since we cannot separately control at what degree the program affects the dark and bright tones, it is often impossible to maximize the contrast without clipping the whites or blacks.
I use a different technique to have better control over the Contrast. I use the Region sliders in the Tone Curve Panel.
Here is my typical slide configuration for landscape photos.
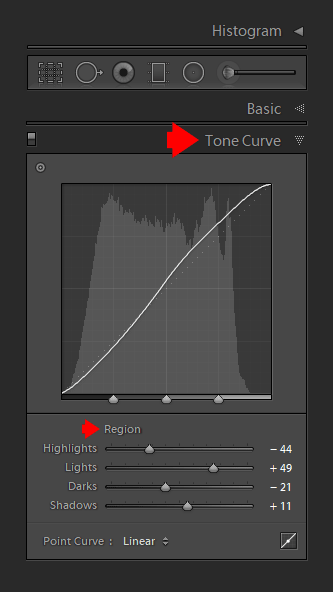
First, I want to ensure I protect the brighter areas of the image from accidental clipping. I set the Highlight value to -44.
I also want to protect the dark tones. I set the Shadows value to +11.
Next, I start experimenting by increasing the Lights’ value and decreasing the Darks’ value.
Of course, every image is different and requires a different Region slider configuration. Generally, I boost the Lights to a much higher degree than how much I reduce the Darks.
The ability to adjust the bright and dark areas of the photo separately gives us much better control over the contrast adjustment process.
6. Use Batch Editing
Batch Editing is the process of editing multiple photos simultaneously. It can potentially save an enormous amount of time when used properly.
The most common Batch Editing technique is when you select multiple photos in Lightroom and apply the Develop Presets to all of them. Even though this is a very popular approach to Batch Editing, I hardly use it. I find that even after applying a preset to 20-30 photos, I still spend hours tweaking each photo individually.
I use a different method instead.
I most often use Batch Editing with photos taken at the same location. For example, when I have 50 new photos after capturing a sunset, I know that all the photos were taken in similar lighting conditions using a comparable shooting technique. This means the photos will require a similar editing approach.
I select a single photo that best represents the shooting scene. I use the Rapid Editing workflow by applying the style Develop Preset first, and then I use the Toolkit Preset Collection to finetune the image. If necessary, I might manually tweak a couple of the editing sliders, most likely from the HSL Panel, to adjust the individual colors separately.
When I am happy with the final result, I select the rest of the photos from the shoot and apply the same edits to all of them. I use one of the methods I outlined in this article: How to Batch Edit in Lightroom.

Using this Batch Editing method produces the best results. I hardly need to do any editing to the individual photos.
7. Use Selective Sharpening in Lightroom Classic
Generally, I do not use default Noise Reduction and Sharpening in Lightroom. I prefer Photoshop instead because I find that it gives me more options with more advanced methods to keep noise under control.
Let me explain.
When I sharpen my landscape photos, I always apply sharpening selectively. I never want to sharpen the area of the sky or the water; I may even soften these areas using noise reduction.
Related: My Favorite Technique to Add Vignetting in Photoshop
In Photoshop, I apply sharpening to the entire image first and then use the transparency masks to affect only the selected areas.
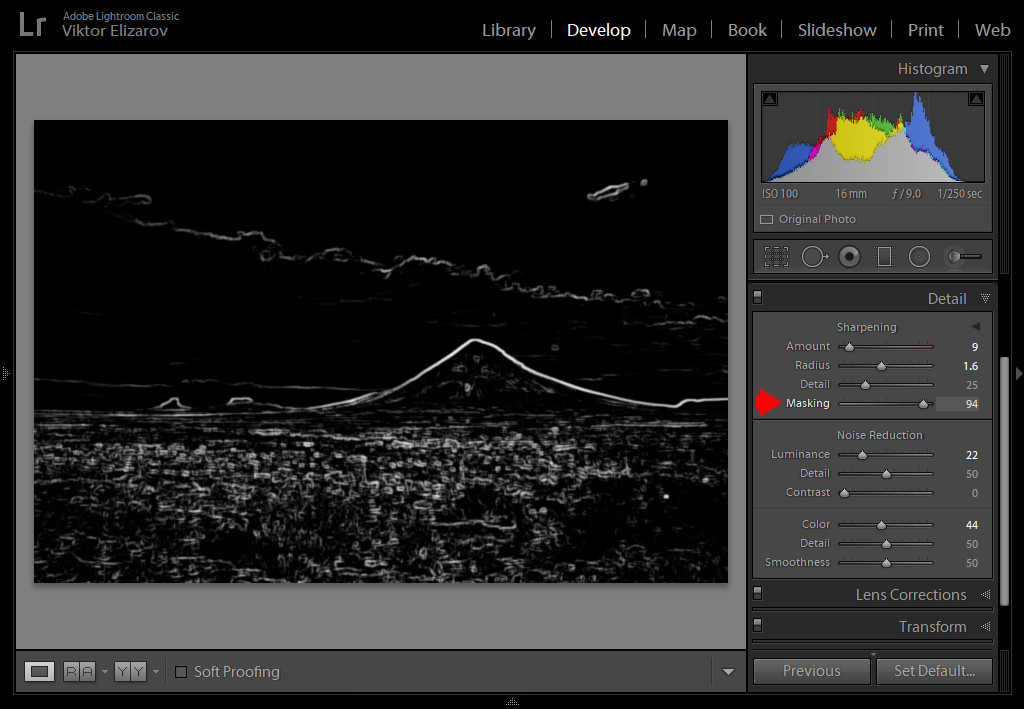
Even though Selective Editing in Lightroom is limited, we still have some control over-sharpening. After applying sharpening to the entire image, you can open the Details Panel and use the Masking slider to narrow the affected area.
Here is the main trick—hold the Alt/Opt key down when dragging the Masking slider to better visualize the affected area. The area affected by the sharpening will show in white, and the unaffected area will show in black. By using high Masking values (90-100), you can limit the sharpening effect to only the edges of the photo.
I use this Selective Sharpening technique when I do not have time for Photoshop editing.
8. Use Import Presets
The preset functionality is a foundation of Lightroom. The program uses nine different types of presets (develop presets, metadata presets, filter presets, export presets, etc.) in various areas to help photographers speed up and automate the entire editing process.
I consider the Import Presets to be one of the most useful and, at the same time, the most underutilized tool by many photographers.
Without a doubt, Lightroom’s Import Module is the most confusing and least intuitive area of the program. It causes the most headache and confusion for new Lightroom users.
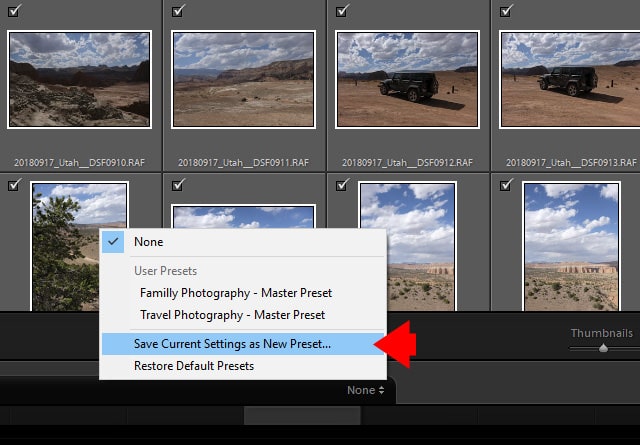
The best way to overcome the complexity of the Import Module is to create Import Presets and use them with every import.
Resources:
9. Use the Histogram as an Editing Tool
In photography, the Histogram is the graphical representation of pixels distributed in any given photo based on its brightness.
The Histogram is a photographer’s best friend. When used in a camera, histograms help us produce well-exposed photos. When used in Lightroom or any other photo editing program, histograms help us fine-tune or correct the exposure.
In Lightroom, the Histogram is more than an informational function. It is also an editing tool.
In the Develop Module, if you move the mouse over the Histogram, you can select five different areas. By dragging the mouse to the right and left, you can visually adjust the following parameters—Blacks, Shadows, Exposure, Highlights, and Whites.
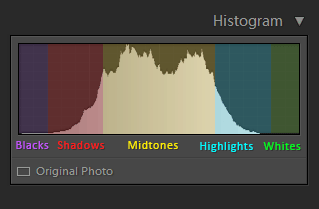
It is basically gamification of the editing process. It is fun to see how reshaping the Histogram affects the corresponding photo.
Resources:
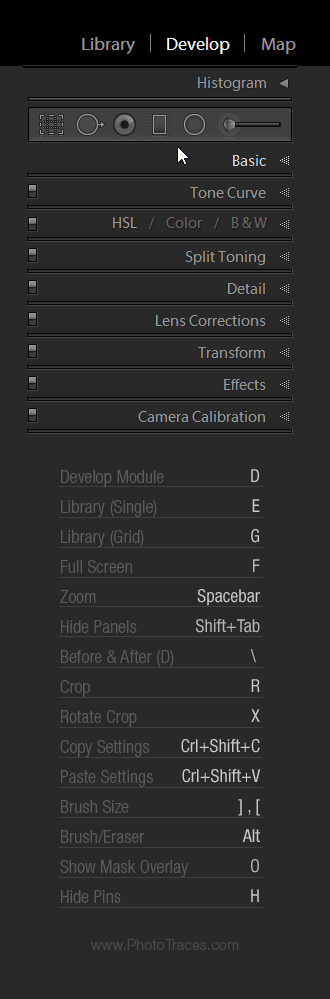
10. Learn Only the Essential Shortcuts
I do not have to convince anyone that keyboard shortcuts can drastically speed up the use of any computer program. We all understand that. But learning keyboard shortcuts in Lightroom is more challenging than in any other program, including Photoshop. First, there are over 100 shortcuts in Lightroom. Second, the same shortcut can have different functions in different program modules.
My approach to Lightroom shortcuts is to learn only the most essential and useful shortcuts to your Lightroom workflow and disregard the rest.
For example, my all-time favorite shortcut is “\” (backslash), which reverts the selected image to the original state without changing the crop adjustments. It is the best way to check the results of your editing. The shortcut is called Before & After.
There is another useful trick for memorizing the most useful keyboard shortcuts in Lightroom. You can use the Panel End Mark function to display the cheat sheet with all your favorite shortcuts inside the side panels.
Check out the tutorial below to learn how to download the most useful shortcuts cheat sheet and display it in Lightroom.
Resources:
11. Use the Power of Alt/Opt Key
Keyboard shortcuts in Lightroom trigger certain functions in the program. They simply save time. But there is another set of keyboard keys that function quite a bit differently. They modify or extend the functions of the existing editing tools. I call these “keyboard modifiers.”

The most important keyboard modifier in Lightroom is the Alt/Opt key. The common role of the Alt/Opt modifier is as a reset function. For example, by holding down the Alt/Opt key in the Basic Panel, new reset options (Reset Tone and Reset Presence) appear. You can reset multiple editing sliders back to their default values by clicking the new reset option. The Alt/Opt key triggers reset options in almost every editing panel.
Another useful function of the Alt/Opt keyboard in Lightroom is visualization. It helps you see the affected area of the editing function, such as sharpening, noise reduction, or split toning.
For a full list of the Alt/Opt functions, check out this article here: Lightroom’s Secret Weapon – Alt/Opt Keyboard Modifiers
12. Change Mask Color of Adjustment Tools
When Lightroom was originally released, it had no selective editing tools. Effects could only be applied to the entire image. For selective editing, you had to use Photoshop.
Over time, Adobe added a range of selective adjustment tools to dramatically change the usefulness and versatility of the program.
The Adjustment Brush, the Graduated Filter, and the Radial Filters are tools that made Lightroom an editing powerhouse suitable for any type of photography.
To better visualize the effect of the adjustment tool, you simply use the shortcut “O” (it stands for “overlay”) and Lightroom shows the affected area of the image in red (the default color).

If your image has predominantly red colors, it is difficult to visualize red against the default red. Use the shortcut “Shift+O” to change the color of the overlay. Your options are green, red, blue, and grey.
13. Use Solo Mode in Develop Module
Lightroom has nine total editing panels in the Develop Module. When you have all the panels open, finding the editing slider you need can be extremely difficult. Plus, the entire editing process becomes an exercise in constantly scrolling through the extended panels.
Luckily, there is another option. Solo Mode allows you to have only one editing panel open at a time.
To access Solo Mode, right-click the header of any editing panel and select the Solo Mode option.
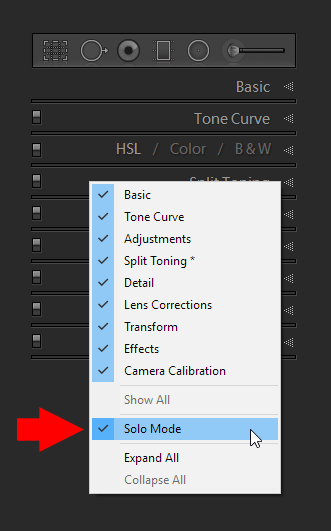
In my case, Solo Mode is always active and keeps my UI neat.
14. Use Guide Overlays When Cropping Photos
If I had to estimate, I would say that I use the Crop Overlay tool with 99% of the images I edit. Of course, I always try to get the right composition in the camera, but even when I succeed, each photo requires some tweaking.
Sometimes, I need to straighten the horizon or crop out a distractive rock. Other times I want to improve the composition by making it tighter.
This is when the Guide Overlay comes into play. The tool is a visual helper that makes our job of improving composition so much easier.
When the Crop Overlay tool is active, use the “O” shortcut (“overlay”) to cycle through the seven options—Grid, Thirds, Diagonals, Triangle, Golden Ratio, Golden Spiral, Aspect Ratios.

In my case, I most often use the Golden Ratio and Thirds.
15. Use Cap Lock Autoadvance Mode
When I need to go through thousands of photos to rate them as “rejects” and “keepers,” the Autoadvance Mode in Lightroom’s Library Module comes in very handy.
Hit the Caps Lock button to activate it.
With the Autoadvance Mode activated, hitting the “P” (“pick”) shortcut flags the image and automatically advances to the next image. This seems like only a small help, but it saves a great amount of time when culling a large number of images.
Resources:
FAQ: Lightroom Workflow
How can I streamline the export process in Lightroom for different purposes?
To streamline the export process in Lightroom for various purposes, I rely on the creation of export presets. This solution may not be groundbreaking, but it proves highly effective. By developing a set of export presets, I can effortlessly apply them to different scenarios.
I’ve crafted specific export presets tailored for internet use, employing the JPEG file format and ensuring a small file size. These presets allow me to maintain control over critical factors such as file format, image size, file renaming, and even sharpening.
Moreover, I’ve established dedicated export presets for instances where high-resolution files are necessary, particularly for print purposes. This flexibility in presets caters to different output requirements without the need for manual adjustments each time.
For those seeking more detailed guidance on my approach, I’ve put together a dedicated tutorial on “Lightroom Export Settings,” providing comprehensive insights into optimizing the Lightroom export workflow for various needs.
What is the importance of using keywords in Lightroom?
Using keywords in Lightroom is essential for efficiently organizing your photo library. Keywording is a powerful tool. Striking a balance between insufficient and too many is crucial for a smooth Lightroom workflow. If you neglect keywording, finding specific images becomes challenging. On the other hand, excessive keywording can complicate your workflow, making it time-consuming.
As a travel and landscape photographer, I primarily keyword my RAW files based on the locations where my images were taken. Additionally, for family photography, I use keywords for individual family members. This approach streamlines my workflow and meets my needs without unnecessary complexity.
I employ advanced methods such as smart collections to enhance my organization further. For instance, when I add a keyword like “Yosemite National Park” to an image, it automatically populates in my Yosemite smart collection. This automation saves time and adds a layer of efficiency to my workflow.
Finding the right balance in your keywording strategy is essential. It ensures that your images are adequately tagged.
What is the best way to cull and select the best images in Lightroom?
As a landscape photographer, I often return from a shoot with a thousand new photos, and culling them becomes a critical component of my processing workflow. The objective is to efficiently cull the collection down to the finest images without waiting time.
The culling begins promptly after I’ve inserted my memory card into the card reader, and the batch is imported into Lightroom. I navigate to the Library module to start my two-pass culling process.
In the first pass, I focus solely on identifying and rejecting images that don’t make the cut. This includes any out-of-focus shots, unintentional shots, instances of overexposure with blown highlights, and those with crooked horizons that are beyond correction.
On the second pass, I go through the remaining images, flagging those with potential for future processing and publishing. I don’t use color labels or star ratings; flagging is all I do. Sometimes, if necessary, I’ll make preliminary adjustments to the white balance or horizon lines to better evaluate a photo’s prospects.
This streamlined approach to culling in Lightroom is a pivotal part of my workflow process, allowing me to easily sort through thousands of images.
What is the key to effective lightroom workflow?
The key to an effective non-destructive workflow in Lightroom revolves around consistency and customization tailored to your personal style and efficiency. While there is no singular “perfect” workflow in Lightroom, discovering an optimal process that marries your photography style and editing habits is crucial.
An effective workflow starts once you import image files from your memory card into Lightroom. Being methodical and consistent in this process, from culling to color toning, through various editing steps, and culminating in the export, is vital. When these steps become second nature, it reduces redundancy and accelerates your editing process.
Additionally, employ Lightroom’s presets to aid your workflow. By effectively utilizing import presets, ensuring consistent file naming and renaming, applying watermark presets, develop presets, and setting export presets, you streamline your workflow and ensure a uniform outcome throughout your projects. Catering your workflow to your needs not only refines your post-processing but will invariably save you time for the creative aspect of photography.
Lightroom Workflow Tips: Conclusion
I listed 15 of my favorite Lightroom workflow tips that have the strongest impact on my photography. You do not have to memorize or learn all of them. Simply select the ones that can significantly improve your photo editing workflow and incorporate them into your editing process.