

Understanding how to export Lightroom presets is essential if you’re eager to share your crafted Lightroom presets with others or simply want to transfer them to a different device.
In this step-by-step guide, I’ll walk you through the quick technique, ensuring that you can effortlessly export your presets and apply your distinct editing style wherever your photographic journey takes you.
To export the Lightroom preset, go to the Presets Panel in the Develop module and select the preset you want to export. Right-click the preset and choose the “Export” menu option. Give your file a name and pick a saving location on the computer. Finally, click on the “Save” button, and you are done.
Luckily, in April 2018, Adobe changed all presets from the .lrpresets format to the .xmp format; this allowed people to use them in Photoshop and Adobe Camera Raw! But it also made preset management and preset export more straightforward than ever before.
Lightroom presets are an easy way to keep your photos looking professional and consistent. They can save you time and make your life easier. But after creating them, you have to know how to manage them to be able to share them with the world.
There are some things that you have to know beforehand.
How to Export Lightroom Presets
How to Export Individual Presets
If you want to sell your presets on a website or send them to a client or friend, you first need to know how to export them.
Steps to export Lightroom Presets:
- Open Lightroom Classic
- In the Develop Module, go to the Presets Panel and select the preset you want to export
- Right-click on the preset and click “Export” option at the bottom of the drop-down menu.
- In the “Export Preset” dialog box, give your file a name and choose a saving location.
- Click on “Save”

If you want to go further and put your file on the web, you have to:
- Go to the file location
- Right-click on the file
- Go to “Compress/Add to Archive”
Your preset will be added zip archive.
How to Export Lightroom Preset Collection
If you’ve delved into creating many presets, you may want to create different collections – according to the mood and feel you want your photos to convey. For example, you may have an exclusively “moody” preset collection, while others may have a more “bright and airy” feel.
Organizing your collections helps streamline your editing process and share them with others. But to share a preset collection, you must first know how to export a preset collection.
Steps to export Lightroom preset collections:
- After creating a Collection (called a preset Group in Lightroom), right-click on it.
- Go to “Export Group” – an “Export Preset” dialogue box will pop up.
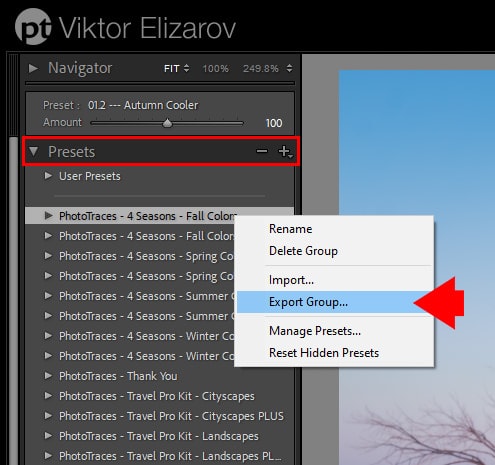
- Give the collection a name.
- Pick the destination folder where you want to save your collection.
- Click the “Save” button.

The Presets Collection will be zipped automatically and exported as a ZIP Archive. And there are no export settings.
How to Export Multiple Lightroom Presets
Lightroom does not have the functionality to select multiple presets in the Presets panel.
The workaround is easy, though: you must create a new collection or select an existing one and place all your presets in it.
Then you can export your collection as a zip archive.
Create New Collection
To make a new collection, you must start by creating at least one preset and moving it.
- In the Develop module, right-click on any Preset from the Preset panel
- Go to the “Move” command
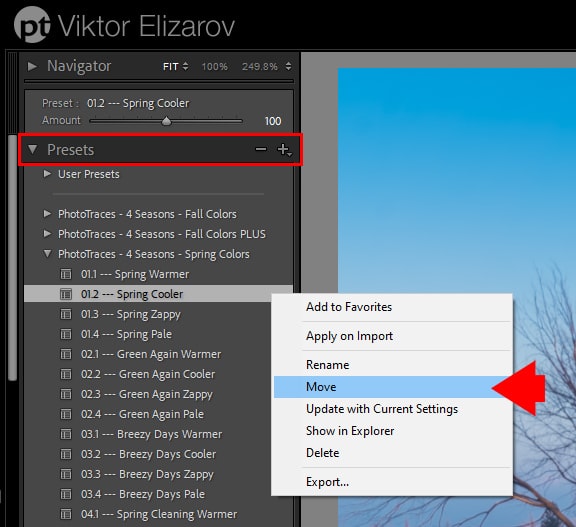
- In the “Move Preset” dialog box, you can see all the “Groups” (collections) you’ve created.
- Choose “New Group” and name your new collection.
- Click on “OK”

- Click the “OK” button
Move Presets to the New Collection
You can’t copy presets in Lightroom; the only option you have is to move them. Once you have created a new collection, you can move any presets you wish to include by:
- Dragging them from the Presets panel onto the collection you want to include them in.
- Right-clicking on them and selecting the “Move” command from the dropdown menu -> Picking the group you want to move them in, and clicking on “OK.”
After following these two steps, you can choose to export your presets as a collection.
How to Export Lightroom Presets Manually
Exporting Lightroom presets manually was the standard way of doing it before 2018; this meant taking each preset individually, going to their saved location, and choosing what to do with them further.
Steps to export Lightroom presets manually:
- In the Develop Module, go to the Presets Panel and simply select the preset you need to export
- Right-click on the preset.
- Click Show in Explorer (Show in Finder) to find where your presets are stored locally on your computer.

After these steps, you can choose to:
- Compress your preset and put it on the web
How to Import Lightroom Presets After Export
You might’ve bought some presets online or created them yourself. Either way, knowing how to import them into Lightroom is key to using them on your images.
Steps to Import Lightroom Presets:
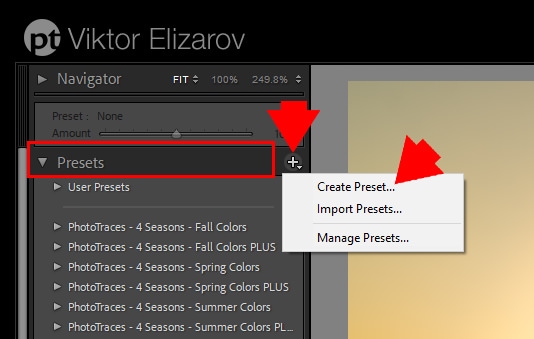
- Go to the Presets Panel in the Develop module and click on the “+” icon in the top right corner.
- Select “Import Presets” from the menu.

- Go to the individual preset or collection you want to import – if you downloaded your preset/s from a creator, this could be a ZIP file. Otherwise, look for the .xmp file.
- Click on “Import”
- You can now see your preset/s in the Presets panel.
How Create (Save) Preset
You can create a preset by selecting an image in the Develop Module of Lightroom Classic and applying all the necessary adjustments. After you finish, you can save all the edits as a preset by clicking on the ‘+’ icon in the top right corner of the Presets panel and selecting the Create Preset option:
The New Develop Preset window will be activated

In the Preset Name text box, give your new preset a name, save it in the desired location (or create a new group), check on “save all adjustments” (or pick the settings you want to save), and then click on “Create.”
Related: How to Copy and Paste Edits in Lightroom
Voila! After doing this, you can go to the next step: exporting Lightroom presets to your computer!
How to Export Lightroom Presets | Final Thoughts
Mastering how to export Lightroom presets has evolved significantly over the years. While exporting presets in Lightroom may have been tedious in the past, advancements in the software have streamlined the process. This tutorial has equipped you with the knowledge to effortlessly share your crafted presets and seamlessly transfer them across devices.
As Lightroom continues to adapt and improve, staying abreast of these techniques ensures that exporting presets becomes a seamless and integral part of your editing workflow.