If you want to understand how to batch edit in Lightroom, you’ve come to the right place.

By now, pretty much every Lightroom user knows that preset-based editing is the fastest and most efficient way to edit a large number of photos in Lightroom. To do this, you record your most common editing steps as a preset that you can later reuse by applying its effects to multiple photos.
For example, when you return home from a day-long shoot and need to process hundreds of photos. You usually start by selecting one photo that you spend time developing. Once you are happy with the results, you save all the editing steps as a preset so you can apply it to the rest of the photos.
But how to apply that preset to multiple photos in Lightroom is not exactly obvious.
In the Develop Module, if you select multiple photos in the filmstrip and try to apply the preset to all of them, Lightroom only applies the preset to the active image displayed in the Loop View. The preset is not applied to the rest of the selection.
This is when batch editing comes in handy.

Let me show you multiple options on how to use batch editing in Lightroom in combination with presets.
How to Batch Edit in Lightroom – 7 Methods
1. Use Synchronization Method in Develop Module
Start by applying the preset to the active image in the Develop Module. The active image is the image you see above the film strip as the large preview.
Next, select multiple images in the filmstrip while ensuring that the original image remains active.
With multiple images selected, hit the ‘SYNC…’ button at the bottom right of the editing panel.

Once you hit the ‘SYNC…’ button, the Synchronization Settings panel will pop up, where you can select which parameters you want to synchronize.

For example, you might deselect the Exposure checkbox because you will likely need to tweak the exposure settings for each image individually. Another common option to deselect is the Crop Overlay since uniformed cropping is rarely used across multiple photos.
Once you are happy with your selections, press the ‘Synchronize’ button and wait as the Lightroom batch processes all the selected images by applying identical development settings to each of the images.
There are some disadvantages to this method:
- If you applied some additional editing steps to the original image after applying the preset, synchronizing will use the same combined effect.
- In the History Panel, you can find the Synchronize Settings entry but this will not tell you what exact preset was used.
2. Use ‘Auto Sync’ to Edit Multiple Photos Simultaneously
The ‘Auto Sync’ is a variation of the ‘Sync’ batch editing method I covered above. But, you edit all selected photos simultaneously instead of editing one image and applying performed editing steps to the reset using the ‘Sync’ functionality.
Let me explain.
In the Develop Module, select multiple photos you intend to edit.
Next, locate a little switch next to the ‘Sync’ button below the right editing panel of the Develop Module.
When you flip the switch, the ‘Sync’ button will turn to ‘Auto Sync.’

Now when you edit any selected photos, all the adjustments will be applied to the entire group of images.
The ‘Auto Sync’ butch editing method can be helpful when editing a group of photos taken in the control environment, such as studio settings.
But I found that ‘Auto Sync’ is not very helpful for landscape or travel photography. I prefer the #1 ‘Sync’ method instead.
3. Use Previous Method in Develop Module
This is another way to use batch processing in the Develop Module. To be more accurate, we should call this—semi-batch processing.
See also: How to Organize Lightroom Presets
In this method, you apply the preset to the active photo in the Develop Module. Once you are done making any additional edits, you can click on another image in the filmstrip to make it active.
Next, hit the ‘PREVIOUS’ button at the bottom right of the developing module’s editing panel. All the editing steps from the previous image will now be applied to the active image.

It is not precisely batch processing, but this method can be beneficial when editing multiple photos in Lightroom that require minor adjustments for each image.
For example, you apply the preset to the active image first. Next, you adjust the exposure and contrast before moving to the next image. Using the PREVIOUS button, you can quickly go through a large number of images to ensure each image has the customized settings you prefer.
4. Batch Edit Multiple Images in Import Module
Another option to apply a preset to multiple photos is to use it during the initial process of importing images into the Lightroom Catalog.
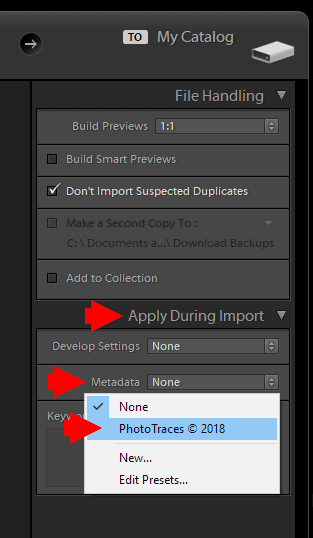
You have various import options when you are ready to import multiple photos into Lightroom. Under the Apply During Import panel in the Import Module, you can specify what Develop Preset to apply to all the images by selecting the appropriate preset from the Develop Settings drop-down menu.

For example, you may want to apply the Lens Correction preset to your new images.
When I was shooting with Sony, I created a dedicated develop preset with Lens Correction adjustments only, and I used it on every photo I was bringing to Lightroom. Since I am shooting with Fujifilm now, this step is unnecessary because Lightroom automatically applies the Lens Correction adjustments to Fujifilm RAW images.
Or, since the AI editing options in Lightroom are now more powerful, you can apply Auto Tone Adjustments to all the photos during the import to Lightroom. Lightroom calculates and makes the initial tone adjustments for every imported image.
3. Batch Edit Using Quick Develop Method in Library Module
Use the ‘G’ keyboard shortcut to switch from the Develop Module to the Library Module in Grid View.
Select multiple photos in the Grid View by holding down the ‘Shift’ (‘Option’ on Mac) key. From the right panel, open the Quick Develop panel by pressing the triangular icon.
From the Saved Presets drop-down menu, select one of the presets. The effect of the chosen preset will be applied to all of the selected images in the Grid View.

I rarely use batch processing in Library Module. Occasionally, I might use it if I forgot to do it during the import process.
6. Batch Edit Copyright Information
The first four methods of batch editing in Lightroom are related to the Develop Presets. But, since Lightroom employs 9 different types of presets, you are not limited to develop presets only.
You can batch edit multiple photos to add extra metadata to every image you bring to Lightroom.
The metadata is additional information that can be embedded into each photo. For example, the EXIF information (aperture, shutter speed, ISO, focal length, etc.) is part of the metadata. The photo’s location, keywords, and copyright information can also be stored in the metadata.
In my case, I add copyright information to every photo during the Lightroom import process.

First, you need to create a Copyright Preset and reuse it in the Import Module on every batch of new images you bring to Lightroom.

For more information on creating and using the Copyright Presets, check my dedicated article here: How to Create and Use Lightroom Copyright Presets.
7. Apply Watermark to Multiple Photos on Export
I am not a big fan of watermarks. I believe that, in most cases, they ruin photos and their protective effect is questionable. The reason I use watermarks is for discovery purposes. A watermark is very effective if someone comes across one of my photos and wants more information about the photographer or how to purchase it.
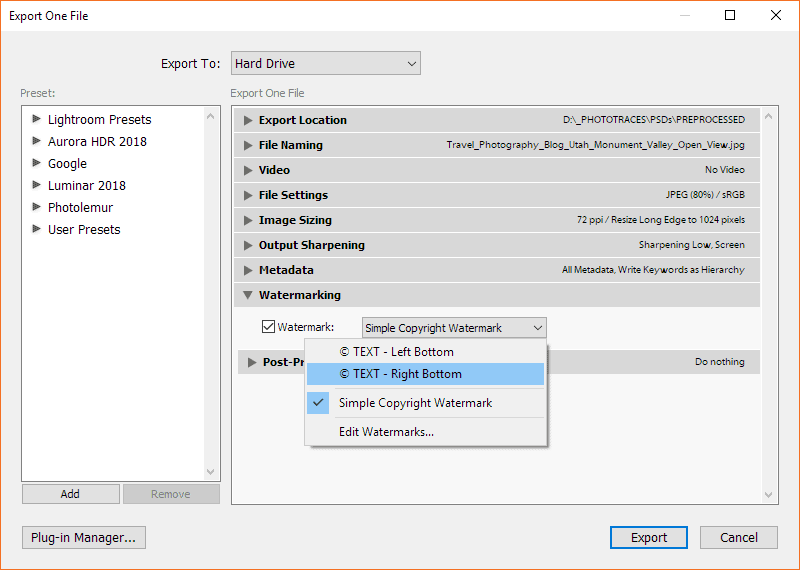
There is no way to add a watermark to any image in Lightroom during development. The only way of doing this is during the export. The original photo in the Lightroom catalog stays unchanged, but the watermark is added to JPEG (or other formats) image you export.
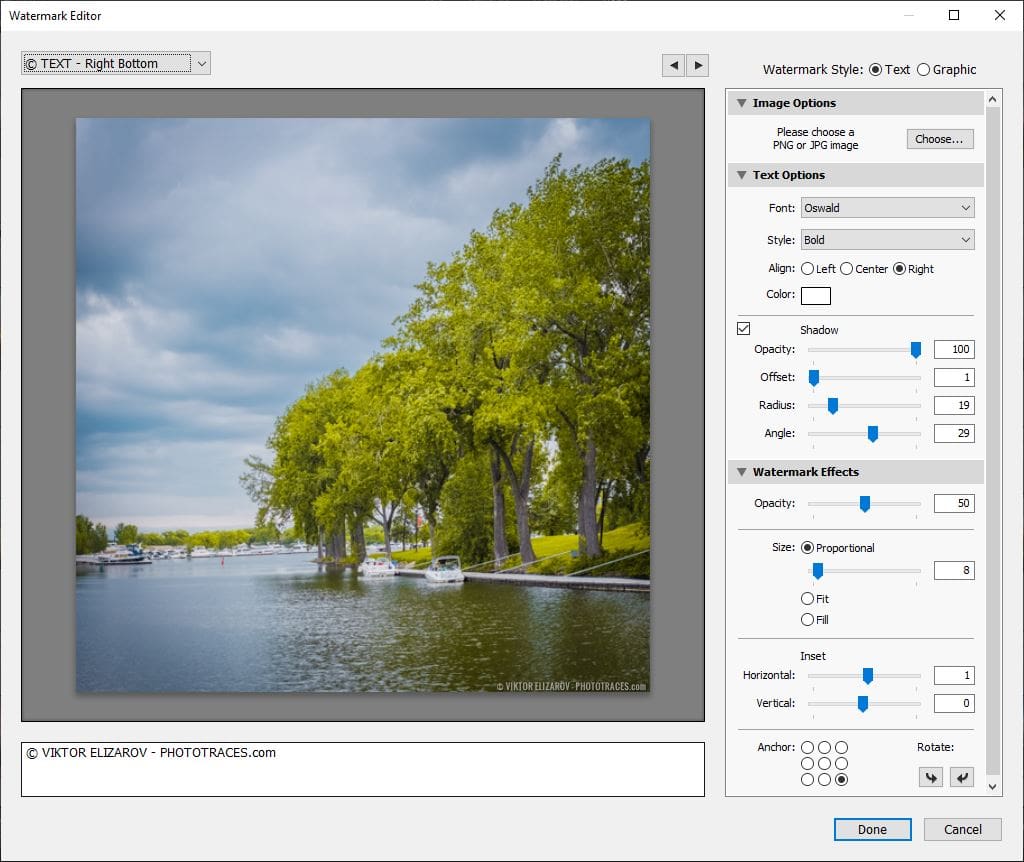
Before adding a watermark to exported images, you need to create a Watermark Preset in the Watermark Editor and save it.

In my case, I only have two Watermark Presets. Depending on the content of the photo, I select one preset to add a watermark to the bottom right corner of the photo. The second preset adds a watermark to the bottom left corner.

You can find my in-depth tutorial on how to create and use the watermark presets in Lightroom: How to Create and Use Watermark Presets in Lightroom.
8. Batch Rename Images in Lightroom
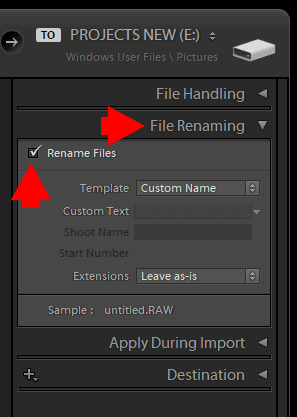
The final batch editing option allows you to rename the digital images you bring to the Lightroom catalog.
It is a more obscure batch editing option, and not every photographer uses it. But, I find it is beneficial for my digital workflow. I rename all photos I import to Lightroom.
Let me explain why I use batch renaming in my photography.
When I import a photo to Lightroom without changing the file name, this is what I see in my photo library:
_DSF0369. RAF
Here is the same image after I use Lightroom’s file renaming feature:
20180727_California_DSF0369. RAF
Now, the file name tells me that I took the photo on July 27, 2018, in California using a Fujifilm camera. I can still use the original filename as a reference.

For more information on how to batch rename digital files, please refer to my dedicated tutorial here: How to Rename Files in Lightroom for Better Image Discovery & Organization.
FAQ: Lightroom Batch Editing
Can you edit multiple photos in Lightroom?
Absolutely. Lightroom was created as a version of Photoshop for organizing and editing a high volume of photos of digital photography. Lightroom has unique functionalities allowing digital photographers to batch import, batch organize, batch edit, and export multiple photos fast.
How do you batch edit with presets in Lightroom?
There are multiple ways to batch edit with presets in Lightroom. My favorite one is selecting the most interesting photo from the recent photoshoot and applying the develop preset to it. Next, I fine-tune the image using various adjustments of the right editing panel. When I am happy with the result, I use the ‘Sync’ functionality to apply all the editing steps to the rest of the photos.
Can you batch edit in Lightroom mobile?
Even though there are not many ways for batch editing in Lightroom Mobile compared to Lightroom Classic, you can still batch easily.
First, you apply the preset to the selected photo. Next, select the ‘Copy Settings’ option from the top menu.
Finally, select multiple images from the image folder and use the ‘Paste Settings’ option from the top menu.
All the selected images will be edited with the adjustments from the original photo.
What are the benefits of batch editing?
The two main benefits of batch editing are speed and consistency.
Batch editing allows you to quickly edit a high volume of photos and produce consistent results through the entire collection of images.
How do I copy the settings to a new photo?
In the Develop Module, select the photo from which you want to copy the settings. Use the keyboard shortcut ‘Control + C’ (‘Command + C’ on Mac), press the ‘Check All’ button, and then the ‘Copy’ button in the right bottom corner. Next, select the next photo and use the shortcut ‘Ctrl + V’ (‘Command + V’ on Mac) to paste the settings.
Can you export multiple presets from Lightroom?
Yes, you can. You can export individual presets as well as a preset group. Please check my dedicated tutorial here: How to Export Lightroom Presets
How to Batch Edit in Lightroom | Final Thoughts
As you can see, if you understand how to batch edit in Lightroom, it can be a valuable tool for quickly processing a large number of digital images. In combination with preset-based editing, you can speed up and streamline the editing process in Lightroom even further.
If you incorporate simple methods to batch editing in your Lightroom workflow, you will spend less time in front of a computer and more time shooting and exploring.

