If you want to change Lightroom Catalog location, you must ensure you’re not missing out on any essential steps.

Let’s start from the beginning. Lightroom has three main components:
- Lightroom installation (program files)
- Lightroom catalog
- Lightroom image library
If you want to move Lightroom to a new computer, you need to move all three components.
However, if you’re going to move only photos to a bigger hard drive, you have to move one component – the image library.
I have dedicated tutorials for both scenarios (see below)
In this article, we’re going to focus on how to move Lightroom Catalog to a new location!
What is Lightroom Catalog?
A Lightroom catalog is a database that stores all the information about images you import and their respective settings for your Lightroom workflow. The catalog contains a preview of each photo, metadata such as keywords, ratings, develop settings, and galleries organization structure.
The catalog helps Lightroom to keep track of all your photos and their respective settings. You can have multiple catalogs for different projects, or you can use just one catalog for everything.
A Lightroom Catalog also stores:
- image previews: they range from low-resolution JPGs to full-size images
- developing information
- metadata (captions, keywords, etc.)
- galleries structure
The most significant advantage of a Lightroom Catalog is that all the edits you do on your photos are nondestructive. Any change you make to your image will be stored as additional metadata XMP format, and the original image will stay untouched.

Reasons for Changing Lightroom Catalog Location
You Run out of Space on Your Hard Drive
If your import process gets stuck, the most common reason is that the computer has run out of space.
Even if you store all your images on a large external hard drive, Lightroom needs plenty of space next to the catalog to store JPEG previews for each image you import.
If your hard drive where you keep the Lightroom catalog is getting full, it is a good reason to move the catalog to a new location with a ton of space.
Another option is to reduce the size of preview files Lightroom generates on import. But it is only a temporary solution.
- Go to Edit in the upper toolbar
- Select “Catalog Settings”
- Select “File Handling”
- Reduce preview size
You Want to Speed Up Lightroom
Lightroom can get incredibly slow, especially when dealing with a large image library. But there are ways of making the app more responsive: you can move your catalog to an SSD drive to speed up Lightroom.
Lightroom catalog runs much faster on SSDs than on HDDs.
At the same time, SSDs are generally less cost-effective than spinning HD, and storing large image libraries on them is cost prohibitive. But running Lightroom catalog off SSD is a very effective solution.
You Want to Back up Lightroom Catalog
When you have only one copy of your catalog, losing that catalog means losing your images! So it’s always a good idea to back up your pictures.
Lightroom regularly backs-up catalogs, but it does that using the same location. Moving your catalog to an external drive ensures that your photos are safe if your hard drive dies completely.
Alternatively, you can automatically tie your Lightroom catalog to a cloud storage location (like Dropbox). However, this would entail paying an additional monthly subscription fee.
How to Change Lightroom Catalog Location
There are a couple of steps you need to follow to change the Lightroom Catalog location:
1. Locate Lightroom Catalog from Catalog Settings
First and foremost, you have to find the location of your catalog.
How to locate Lightroom Catalog:
- From the top main menu, locate the “EDIT” tab (“Lightroom Classic” on Mac) and click on it
- Select “Catalog Settings”
- In the “General” panel, click “SHOW.”
- Explorer/Finder will open the catalog file location – you can recognize it by the .lrcat file extension

2. Copy Lightroom Catalog and All Supporting Files
Things to consider:
You might want to ensure you’re also copying all the supporting files when copying an entire catalog.
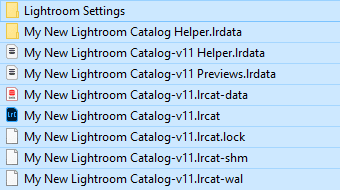
Supporting files include Previews File, Smart Previews file, or the Helper. lrdata catalog. They contain all the relevant information from your Lightroom Catalog – like settings, previews, and presets.

You should change the location of your catalog by copying, not by moving.
When copying a catalog, you have the original one and create a duplicate in the new location. I think it’s better to be safe than sorry: removing files from the original location only when the process of moving is successful ensures you won’t lose any of your work.
You know the location of your Lightroom Catalog (.LRCAT), so you only have to copy it from there to the new location.
How to copy and paste Lightroom Catalog:
- Highlight all the files inside the Lightroom catalog folder (look for the lrcat file extension: catalog.lrcat, catalog.lrcat-data, Previews.lrdata, Helper.lrdata, etc.)
- Right-click on them and select “Copy.”

3. Paste Lightroom Catalog and Supporting Files to New Location
How to Paste Lightroom Catalog and Supporting files to New Location:
- After clicking on “Copy,” go to the location you want to move your catalog and files in
- Right-click and select “Paste.”
- Wait until the transfer is over. It might take some time if you have large photo library.
4. Open Lightroom Catalog from New Location
It’s time to check if your catalog was copied successfully by opening it from the new location.
How to open Lightroom Catalog from a new location:
- Double-click on the .lrcat file in the new location
5. Find Lightroom Missing Folders (Optional)
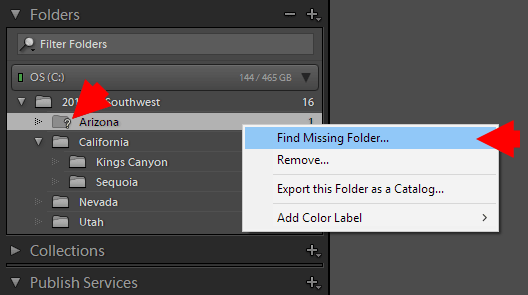
If you see a question mark next to files in the Folder panel, Lightroom can’t find certain folders or photos. In this case, you’ll have to look for them manually.
How to find missing folders:
- In the Folders panel, right-click on the missing folder (look for the question mark)
- From the dropdown menu, go to “Find Missing Folder.”
- Re-link the missing folder by going to the new location – Lightroom will automatically map folders to the new location

6. Double-Check the New Catalog Location (Optional)
It can’t hurt to check again, so follow the steps you did at the beginning when finding your catalog:
MAC: Lightroom Classic > Catalog Settings > SHOW > Check the catalog location
PC: Edit > Catalog Settings > SHOW > Check the catalog location

Should I Move Lightroom Catalog to External Hard Drive?
The answer to this question is: it depends!
But I would not do it.
Let me explain.
It is common for traveling photographers to move the Lightroom catalog to an external hard drive so they can run Lightroom from desktop computers at home and from laptops when traveling.
Unfortunately, this process slows down Lightroom significantly.
Lightroom is not famous for being a fast application. And the easiest way to improve its performance is to run the Lightroom catalog from the quickest drive, preferably from an internal SSD.
Moving the Lightroom catalog to an external hard drive, which is always much slower than internal, will jeopardize the performance of Lightroom. It will run painfully slow. I know; I tried it.
But I have an alternative solution, which I use during my trips.
I create a Temporary Catalog on my laptop for every trip and merge it with the master catalog when I return home.
For a dedicated tutorial, refer to this article on how to merge Lightroom Catalogs.
Change Lightroom Catalog Location | Final Thoughts
A Lightroom Catalog is a database file that stores your photos, metadata, and all the processing you have applied to your photos.
Regardless of your reasons for moving your Lightroom catalog, now you have a step-by-step tutorial to help you along! As luck would have it, a mislaid Lightroom catalog is an easy enough thing to change.


