In today’s Lightroom tutorial I want to show you how merge Lightroom catalogs functionality helps me to manage multiple catalogs when I travel.

How to Merge Lightroom Catalogs
If you are here only to learn how to merge catalogs in Lightroom, below is the simple answer in 5 easy steps. But, if you want to know how I use the merger functionality in my travel photography, go through the article.
- Step 1: Open the catalog you want to keep as a Master after the merger.
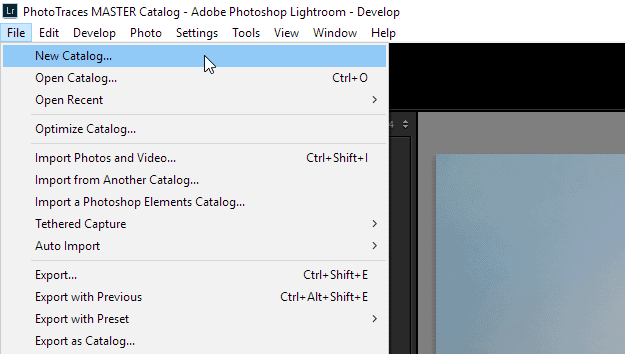
- Step 2: From the top menu, select File > Import from Another Catalog… option.
- Step 3: Select the catalog you want to merge with the open one and click the Choose button.
- Step 4: From the Import from Catalog menu, select what files and folders you want to merge.
- Step 5: Click the Import button.
- Step 6 (optional): Rebuild previews for merged photos by selecting from the top menu Library > Previews > Build 1:1 Previews.
As an early adopter of Lightroom, my editing workflow has gone through a series of evolutions over the years. When Lightroom’s beta version was released, there were no tutorials or guides, which left early adopters like me to figure out each and every step of the workflow on our own.
My first big mistake in how I used Lightroom was due to the fact that I did not fully understand the concept of the Lightroom Catalog. After using Adobe Premiere and After Effects frequently for years, I assumed that the Lightroom Catalog was the equivalent to the Project in other applications.
This assumption led me to create and manage multiple catalogs in my early Lightroom days. As a result, I gained firsthand experience and a greater understanding that managing multiple catalogs was hell. Since it is impossible to search for photos across separate catalogs, I had to close and open catalogs multiple times. I also had to remember what photos I kept in each catalog. Like I said, it was absolute hell.
After I learned my lesson, I combined my catalogs together by creating one Master Travel Catalog. At the same time, I kept a separate catalog for my family photos. The idea was to separate (and keep separate) my travel photography from personal stuff.
Related: How to Change Lightroom Catalog Location
But, this did not work well. The line between professional and personal work is blurry at times. I often had photos from both categories on the same memory card. This meant that I had to import photos twice into different catalogs.
It did not make any sense.
That is when I realized that one catalog approach suits me the best.
Right now, I have one catalog of about 120,000 photos with professional and personal projects organized by tags and albums under one umbrella – the MASTER Catalog.
But, there is still a place for multiple catalogs in my travel photography workflow. I use them when I travel.

How I Use Multiple Lightroom Catalogs
Today, I want to demonstrate how I use multiple catalogs during my photography trips.
My desktop computer is the center of my editing workflow. This is where I permanently keep my Master Single Catalog.
I know some photographers who bring their master catalogs with them when they travel by transferring it from their desktop to their laptop; but, this is not effective or efficient for my workflow.
Lightroom Workflow On the Road
For every trip, I create a TEMP catalog on my laptop. After my trip is over, I delete it and create a new one as the next trip approaches.
Related: How to Revert Editing Steps in Lightroom
I create the TEMP catalog on the primary hard drive of my laptop and by default Lightroom generates the preview files next to the catalog.

At the end of each day of my trip, I import the new photos from that day to my TEMP Lightroom catalog. For the RAW files destination, I choose one of my external hard drives.
To summarize, the result of my import process is:
- Lightroom Catalog resides on the laptop’s hard drive
- Preview files reside on the laptop’s hard drive
- RAW photos reside on the external hard drive
I use the following settings during the import process.

For Previews, I use the MINIMAL option. I check the Create Smart Previews option since the Smart Previews are an integral part of my travel workflow.
I avoid doing any serious editing when I travel. I prefer concentrating on exploration and shooting. But, what I like to do when I am on a plane for anywhere between 6 and 10 hours is to start organizing and culling new photos.
This is when Smart Previews come into play.
When Smart Preview is generated for any given photo, it allows you not only to view it in the library but also edit it in the Develop module when the original photo is not physically preset on your computer.
Instead of having to connect my external drive with all the RAW photos, I can manage the Catalog simply by using Smart Previews.
First, I organize all the new photos into Stacks using the technique I outlined in detail in one of my previous tutorial (Automating Photo Organization in Lightroom) .
Next, I use the REJECT keyboard shortcut (“X”) to mark all the bad images, like those out of focus or taken by accident. After I am done, I delete the images right away since I do not want to import them into my Master Catalog when I get home.
Finally, I use the FLAG keyboard shortcut (“P”) to mark the photos I like and plan to edit in the future.
Related: Soft Proofing in Lightroom Workflow
This is all the Lightroom Classic work I do when I travel.
Lightroom Workflow Back Home
When I am back home, I connect my external hard drive with all the new photos to my travel laptop and copy the temporary travel Catalog file from the laptop to the external drive.
I then connect the external hard drive to my desktop computer. Rather than using the command to Import Photos and Video, I use the Import from Another Catalog… functionality instead.

Next, I select the TEMP catalog, which is located on external HD and I hit the CHOOSE button.
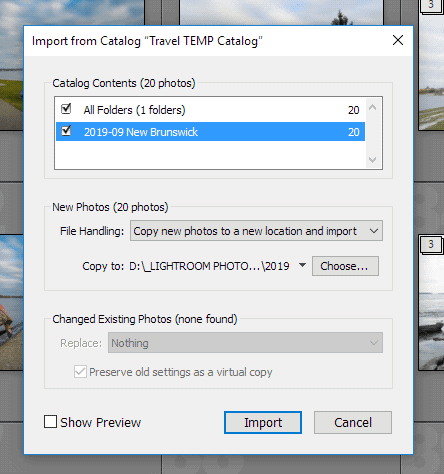
This opens the Import from Catalog menu, which gives me multiple options including the option to import only selective files from the TEMP catalog. In my case, I always import the entire catalog contents since I never keep photos from any of my other trips in my TEMP catalog.

I specify the folders I want to import and the destination on my desktop computer for new photos.
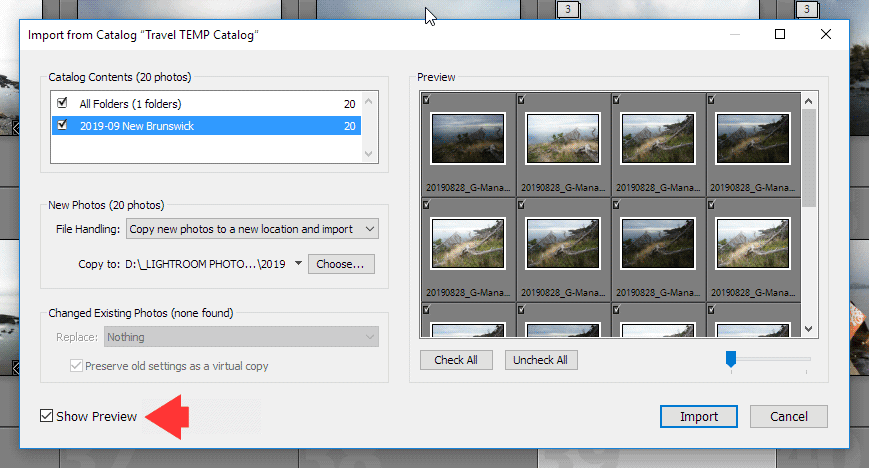
And if you select Show Preview checkbox, you can import photos selectively.

When I hit the import button, Lightroom not only brings the new photos to the Master Catalog but also the metadata, edits, tagging, previews and albums.
Related: My Top 15 Lightroom Workflow Tips
When you use Import from Another Catalog functionality, Lightroom does not generate brand new previews. It only brings existing ones from another catalog. And in case, you need to build 1:1 previews you need to use command Library > Previews > Build 1:1 Previews.
As I mentioned before, it takes time for Lightroom to generate Full Size Previews and Smart Previews at the same time. If I import 5,000 to 6,000 RAW photos in one setting, it might take hours. Normally, I start the import process in the evening and go to bed. By the next morning, everything is ready and I can start editing without wasting any time on organization (stacking, tagging) and culling.
This is when I am finally ready to delete the TEMP catalog.
How to Merge Lightroom Catalogs: FAQ
Can I Combine Lightroom Catalogs?
Absolutely. Lightroom offers us a pretty advanced Import from Another Catalog functionality.
You have the option to import the entire catalog or only individual folders and even single images.
To access the Import from Catalog module, select from the top menu File > Import From Another Catalog… option.
Where Should I Store Lightroom Catalog?
Lightroom is not a very fast application in general, and as your catalog growth is getting slower. And to get the best performance out of Lightroom, you need to store its catalogs on the fastest drive you have.
You can keep your photo library on an external drive, and it won’t affect the performance by much. But you need to keep the catalog and its cache on the fast drive.
For example, I have 3 types of drives on my computer, external, internal spinning drive, and internal SSD drive. And by storing my Lightroom catalog on an SSD drive, I am getting the best performance by a huge margin.
Where are Lightroom Catalogs Stored?
It is a very common question because Lightroom catalog can be stored anywhere on your computer.
When you create a new catalog, you have the option to keep it in your desired location. But if you do not specify it, Lightroom saves the catalog to the default location. The default locations are different on Mac and PC. After using Lightroom for a while, it can be challenging to remember the catalog location.
Luckily, we can ask Lightroom for help. From the top menu, select Edit > Catalog Settings. Open the General tab to find the specific folder where the active catalog is stored and its file name. For more info, please check my dedicated article: Where are Lightroom Catalog and Presets Stored?
How Do I transfer my Lightroom Catalog to Another Computer?
To move the Lightroom catalog to another computer is a multi-step process. You need to install the application, and move the photo library, catalog, settings, cache, and preview files. And the most crucial part is to relink missing folders to new locations. It is not a complicated process, but it takes some time.
For more info, please check my dedicated tutorial here: How to Move Lightroom to a New Computer
Should I Move Lightroom Catalog to an External Drive?
I would not recommend it. As I mentioned above, you can move your entire photo library to an external drive without sacrificing Lightroom performance. But you need to keep your catalog and its cache on the fastest internal drive you have.
Should I Use Multiple Catalogs in Lightroom?
It is not an easy question to answer because every photographer has different workflows and requirements. In my case, I went from multiple catalogs to two catalogs and finally ended up with one catalog. One catalog setup perfectly fits my professional and personal projects.
But if you are an event photographer, you might create a separate catalog for each event. Because after you delivered photos to a client, you are not going to access them often.
If you have a very large catalog of 200K or more images and Lightroom becomes slow, you can separate a single catalog into two. One is active for current projects and archive for old photos you do not access often.
If you are unsure where to start, start with a single catalog setup. And when you feel that you need to expand to a multiple catalog setup, you can do it easily.
You create a brand new empty catalog, and by using the Import From Another Catalog functionality described in this article, bring necessary files and folders from your original catalog.
How to Merge Lightroom Catalogs | Conclusion
Even though one catalog organization suits my photography the best, the Import from Catalog functionality in Lightroom gives me the flexibility to use multiple catalogs when necessary without jeopardizing the simplicity of my travel photography workflow.

