You’ve probably struggled to figure out how to organize Lightroom presets since April 2018. We don’t blame you. Since Adobe changed all presets from the .lrpresets format to the .xmp format, they also rebuilt the entire preset management system.
For example, if you go to the preset folder on your computer and try to move, rename or create new groups of presets, it won’t work; this is because Adobe wants us to manage presets from inside Lightroom—the same way we manage our image library.
As a result, finding a tutorial that provides the correct information about working with presets has been a considerable challenge. It seems like it’s an impossible task because most of the articles on the topic are not up to speed with the latest Lightroom changes.
We’ve decided to give you an in-depth, up-to-date tutorial on how to organize Lightroom presets in 2022
How to Organize Lightroom Presets
Lightroom presets are the best thing ever. They save you time, make your photos look great, and are easy to use. But if you have many, you know that organizing them can be a pain in the neck.
Before starting anything, ensure your presets are backed up – this should always be priority number one! After you’ve done that, you can start organizing!
Here are some of the best ways in which you can manage your Lightroom presets:
1. Disable Lightroom Default Presets
There are a lot of presets that come with Lightroom. Some are useful, but most of them aren’t. The more Lightroom presets you have in sight, the more cluttered your Develop Module gets. It’s better to ensure that only the ones you need are there.
Steps to disable Lightroom Default Presets:
- In the Develop Module, head to the “+” sign next to the Preset panel
- Go to “Manage Presets” from the dropdown menu.
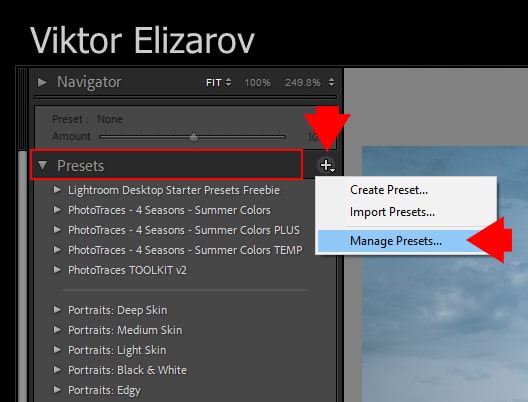
- In the “Manage Presets” dialogue box, uncheck the presets you want to remove from your Presets Panel (check all of them to get rid of all)
- Click “Save”
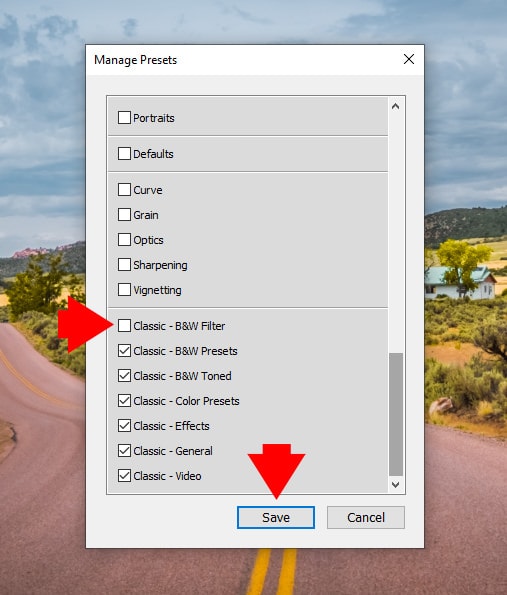
2. Take Advantage of New Favorite Collection
You can add any preset in your Lightroom library to your Favorite Collection. This way, you can access those presets quickly without going through all the presets in the main panel – because they will be right at the top!
When working on a photo, you can quickly choose from your favorite preset collection without going through the ordeal of manually searching.

To add a preset to Favorite Collection:
- In the Develop Module, right-click on the preset you want to add
- Click “Add to Favorites” from the dropdown menu

To remove a preset from Favorite Collection:
- In the Develop Module, right-click on the preset you want to remove
- Click “Remove from Favorites” from the dropdown menu

4. Disable Collection You Do Not Need
It’s great to have different collections for different editing needs. But you’re not going to use them all at once.
A great way to organize your presets is to disable the ones you don’t use at the moment. For example, if you’re processing landscape photos, it may be helpful to disable the presets that you’re using for portraits or cityscapes. This way, you can ensure they aren’t cluttering up your list.
Steps to disable Collection:
- In the Develop Module, head to the “+” sign next to the Preset panel
- Go to “Manage Presets” from the dropdown menu
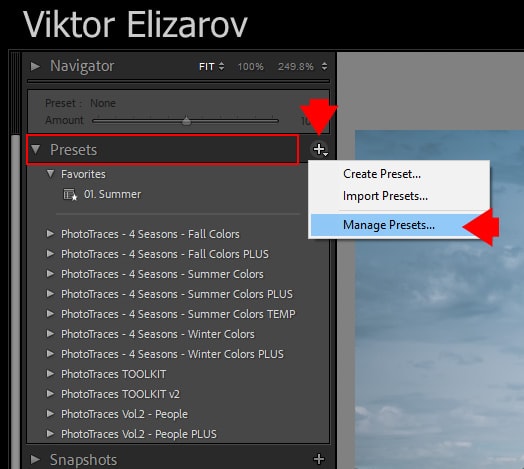
- In the “Manage Presets” dialogue box that pops up, uncheck the collections you want to hide from your Preset Panel.
- Click “Save”
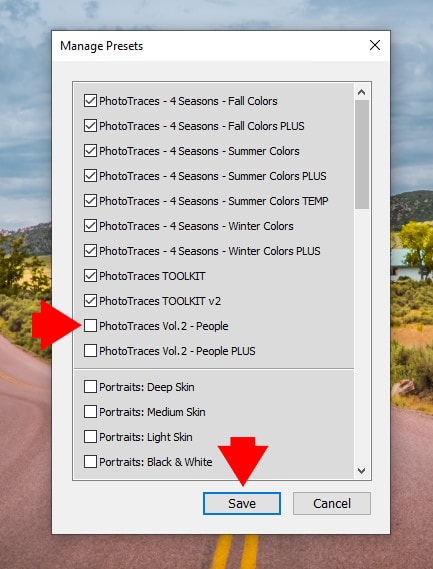
You’ll notice that the Collection has disappeared from the Preset Panel. Don’t worry; you can always enable it again by going to the same dialogue box and (re)checking the Collection you want to add to the Preset Panel.
Please note that disabling a bunch of preset collections will not improve Lightroom performance. Lightroom still loads all of them to memory on startup. It only hides them from the user.
5. How to Rename Preset in Lightroom
An important change that needs mentioning is that you now have to rename presets from inside Lightroom. If you change the name outside, Lightroom won’t know about it and will keep using the original name.
If you want to rename something in Lightroom, follow the next steps:
- In the Develop Module, go to the Presets Panel and right-click on the preset you want to rename
- Click “Rename” from the dropdown menu
- A “Rename Preset” dialog box will pop up. Here you can choose a new name for your preset
- Click “Ok”

6. How to Move Presets to New Collection
You can move presets to a new collection only from inside Lightroom (just like with renaming).
Before, you could go to the preset folder and make any changes you wanted there. Now, the changes you make outside of Lightroom won’t be applied inside the software.
Steps to move presets to New Collection:
- In the Develop Module, go to the Presets Panel and right-click on the preset you want to move
- Click on “Move” from the dropdown menu
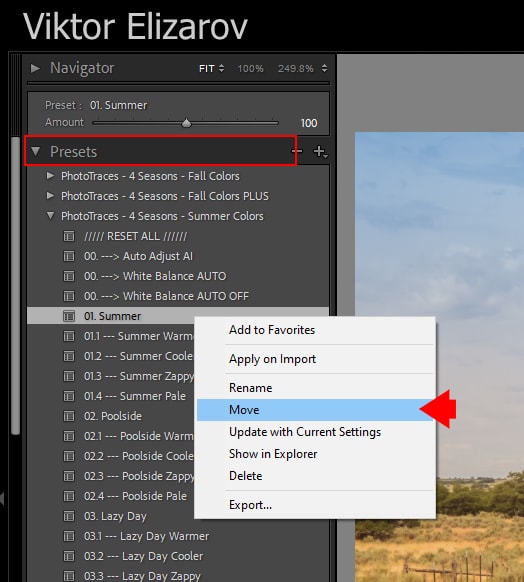
- A “Move Preset” dialog box will pop up. In the Group menu, you can choose the new location for your preset or create a new collection (by picking “New Group”)
- Click “Ok.”

Please note that you can always move the presets by dragging them from inside the Presets panel onto the collection you want to include them in.
7. How to Create a Preset Folder in Lightroom
First, you’ll need to create at least one preset to make a preset folder! So after you have made all the adjustments you want on a photo of your choice and saved your preset, you can start creating the Preset Folder.
Steps for creating a Preset Folder in Lightroom:
- In the Develop Module, pick a photo and apply all the adjustments you want to it
- After you’re satisfied with the result, go to the Preset Panel and click on the “+” sign next to it.
- Click on “Create Preset” from the dropdown menu
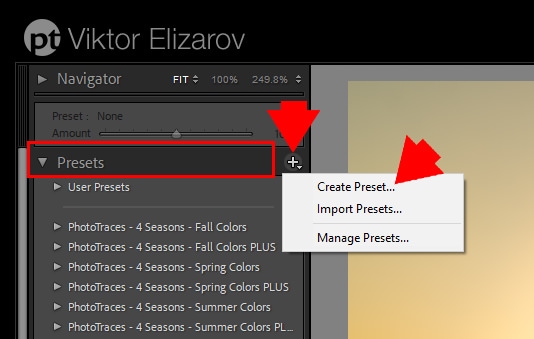
- In the “New Develop Preset” dialogue box, go to “Preset Name” and write the name of your preset
- In the “Group” section, select the “New Group” option from the dropdown menu
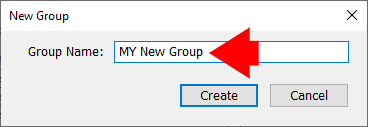
- A “New Group” dialog box will pop up. Here, you can pick the name of your new Preset Folder
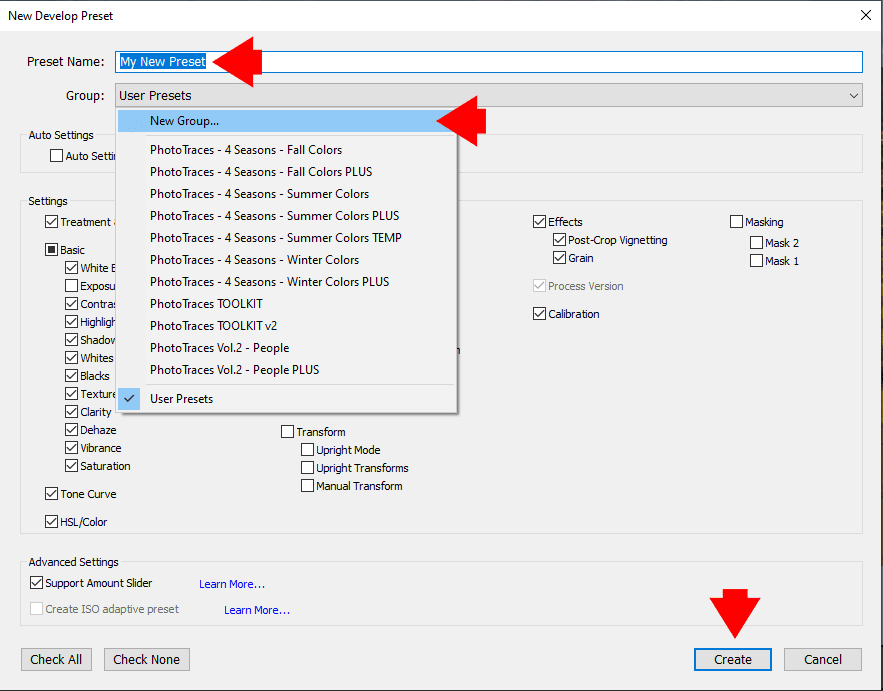
- After giving a second look at all the adjustments in the “Settings” section, click “Create.”
Alternatives:
If you already have a preset and you just want to add it to a new Preset Folder, you can MOVE or IMPORT it.
Move preset to a new Preset Folder:
- In the Develop Module, go to your preset in the Preset Panel and right-click on it
- Click “Move” from the dropdown menu.
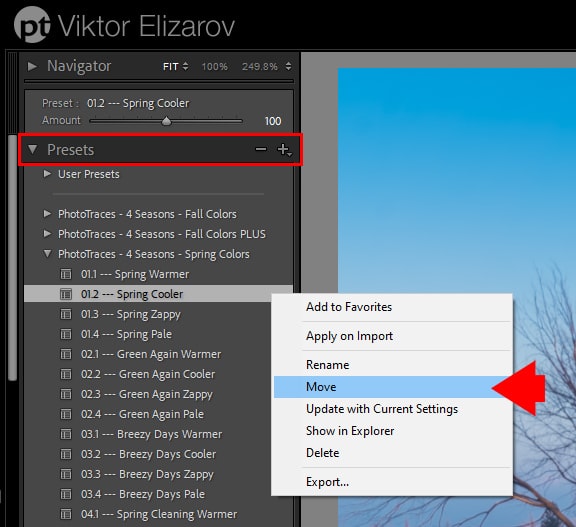
- In the “Move Preset” dialog box, pick “New Group” from the “Group” section dropdown menu
- In the “New Group” dialog box, name your Preset Folder and click “Create”
- Click “OK”

Import preset to a Preset Folder (directly):
- After creating a Preset Folder, you can right-click on it and pick “Import” from the dropdown menu.
- Pick the location of your preset and click “Import”
Voila! You have a new Preset Folder!
How to Organize Lightroom Presets | Final Thoughts
Sometimes, it’s easy to create or buy too many presets; before you know it, you’ve become a preset hoarder.
Learning how to organize Lightroom presets may seem daunting at first, but it is simple. Even if you don’t master the process immediately, you will find it easier once you start doing it. Being diligent about organizing your presets ensures that you can quickly find what you’re looking for, which is especially helpful when you don’t have much time to edit.
And when your editing process is simplified, you can focus more on bringing your creative vision to life.

