To understand how to save preset in Lightroom Mobile, you must see the big picture.
First things first: if you have a big preset library, you will have to create them on your computer and then sync them across devices. That way, you can keep your presets organized and stored in one place and use the essential ones on the mobile app.
We’re going to need Adobe Creative Cloud. As you might know, Lightroom comes with three apps: Lightroom Classic, Lightroom Desktop (former Lightroom CC), and Lightroom Mobile.

Let’s see how each app differs in creating and managing presets – but, more importantly, how they can work together to ease your workflow.
How to Save Preset in Lightroom Mobile
Lightroom Mobile is great for editing on the go and sharing your photos with friends and family. But it’s not ideal for developing a preset library, as it’s impossible to manage them effectively there.
Luckily, there’s a way around this: you can send your favorite preset collections from Lightroom Classic to Lightroom Mobile. It’s a bit more work upfront, but it saves so much time in the long run!
Steps to save presets in Lightroom Mobile:
Create Presets in Lightroom Classic
The first step in organizing and managing Lightroom presets is creating some presets!
Steps to create a preset in Lightroom Classic:
- In the Develop Module, take or pick a photo in Lightroom and apply all the necessary adjustments.
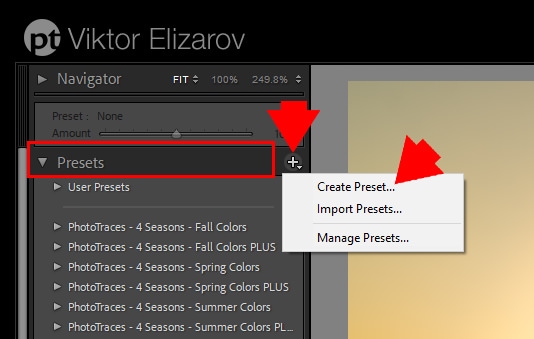
- In the Preset Panel, save the preset by clicking on the “+” icon next to Presets.

- In the “New Develop Preset” dialogue box, go to “Preset name” and give a name to your preset
- Go to “Group” to pick a collection you want to put your preset in (or select “New Group” and create a new one)
- Look over all your adjustments in the “Settings” section (save all or pick the ones you want to keep)
- Click “Create”

You can create as many presets or preset collections as you want. Chances are, you’ll do that once you get the hang of it.
Organizing and Managing Presets in Lightroom Classic
If you have large presets libraries, you need Lightroom Classic to organize them effectively. Once you test out different editing styles, this will probably be the case.
There are several ways in which you can organize your presets in Lightroom Classic; some of the best ones include:
- Disabling Lightroom default presets
- Disabling Collection(s) you do not need
- Renaming presets
- Moving presets (from one Collection/Group to another)
- Creating new Preset Folders/Collections
- Using the Favorite Group
For an in-depth, step-by-step walkthrough of managing presets in Lightroom Classic, check out this previous post on how to organize Lightroom presets.
Use the Favourite Lightroom Presets Functionality
The next step is to add presets you want to use in Lightroom Mobile to your Favorite Group so you can access them more easily.
When you move a preset to Favorites, it will be positioned right at the top of the Preset Panel, so you don’t have to look for it throughout all your Library.
To add a preset to Favorite Group:
- In the Develop Module, right-click on the preset you want to add
- Click “Add to Favorites”

It’s just as easy to get rid of a preset. To remove a preset from your Favorite Group:
- In the Develop Module, right-click on the preset you want to remove
- Click “Remove from Favorites”

Export Presets from Lightroom
Exporting your Favorite Group from Lightroom is a necessary middle step toward transferring it to your mobile app. You can’t move your preset directly to Lightroom Mobile.
In this step, you will export your Favorite Group from Lightroom Classic into a zipped file on your desktop computer (or wherever else you want).
Steps to export Lightroom Favorite Group:
- In the Develop Module, go to the reset Panel and right-click on “Favorites.”
- Go to “Export Group”
- An “Export Preset” dialogue box will pop up.
- In the “Save as” section, give the collection a name
- Next to the “Where” section, pick the location where you want to download your favorite presets
- Click on “Save“

For an in-depth, step-by-step walkthrough of exporting presets in Lightroom Classic, check out this previous post on how to export Lightroom presets.
Import Presets to Lightroom Desktop
The last thing you have to do is import the zipped presets to Lightroom Desktop (former Lightroom CC) – this is the best way to sync your presets with Lightroom Mobile and easily access them.
You can pick just a few presets for Lightroom Mobile – specifically, the ones you use the most. I think a “sweet spot” would be between 5-15 presets.
How to import presets to Lightroom Desktop:
- Open Lightroom Desktop
- From the menu bar, choose “File” and click on “Import Profiles & Presets.”
- In the “Import” dialog box, browse and select the preset you want to import.
- Click “Import.”

Your presets are now synchronized with Lightroom Mobile – you’ll be able to see them in the “Presets” Panel in the app.
How to Create a Preset in Lightroom Mobile
Now you know all the steps to effectively manage a sizeable preset library on all Lightroom platforms.
Alternatively, you can create presets directly in Lightroom Mobile. That way, you can see how the preset develops on your mobile screen.
Steps to create a preset in Lightroom Mobile:
1. Open or import photo in Lightroom Mobile
- Go to your Lightroom Mobile app and click on it.
- In the Library Module, tap the three dots next to “All Photos.”
- Select “Add Photos” from the dropdown menu
- Choose to add photos from “Device” or “Files.”
- You can sort your search in the upper menu by “Time” or “Device Folders.”
- Tap the photo of your choosing
- Tap “Add“
Click “All photos” to see your imported photo and edit it.
2. Make Adjustments to Your Photo
Edit the photo the same why you do it in Lightroom Classic. The adjustments can include changing exposure, color, white balance, or vibrancy, adjusting shadows, highlights, and contrast – edit until you’re satisfied with the result. You can see most of them in the bottom toolbar (with names like Light, Color, Effects, etc.)
3. Creating Preset in Lightroom Mobile
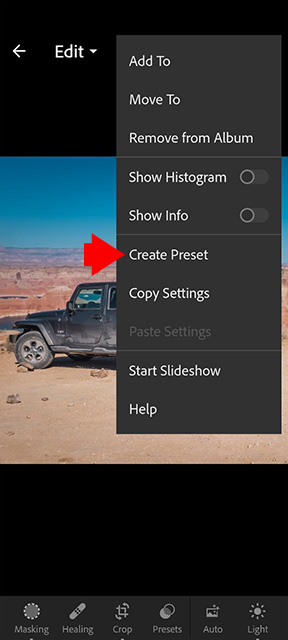
- Click on the three dots in the upper right corner of your mobile screen

- Select “Create Preset“

- In the “New Preset” dialog box, go to “Preset Name” and give a name to your preset
- Go to “Preset Group” and pick an existing group or create a new one (by selecting “New Preset Group“)
- “Select” – you can pick and choose which adjustments you want to keep; check or uncheck according to preference.
- Save preset by clicking on the checkmark in the top right corner of your screen

How to use preset in Lightroom Mobile
This is the last step of the whole process. Once you have created or imported the preset, you can reuse it on any other photo by taking these steps:
- Open an image in Lightroom Mobile
- Scroll the toolbar at the bottom of the screen, and select “Presets.”

- Look for the Group (User Presets in my case) you save your preset in

- Click on the preset
- Press the checkmark button in the top right corner

- Apply any additional adjustments – if necessary
How to Save Preset in Lightroom Mobile | Final thoughts
Creating predictable and repeatable editing workflows is what separates professionals from amateurs. In this article, we’ve thrown down the gauntlet to discuss one aspect of workflow: presets.
It’s very simple to extract your favorite presets from Lightroom Classic, import them into Lightroom Desktop and synchronize them with Lightroom Mobile.
And now that you got organization out of the way enjoy yourself and take some photos!

