

Guess what people complain about the most in Montreal? You are absolutely right, the weather. Here winters are long and cold, with frequent violent snowstorms. Spring is almost nonexistent; it seems that winter transitions into summer just in a couple of weeks. Plus, getting snow in May is not an anomaly. Summers are short and humid. Autumn is probably the best season here, but it is a hit or miss depending on the year.
This year it was hard to complain about the weather. The winter was mild. Even spring was not bad at all, which does not happen here often. The summer was long, hot, and relatively dry. The fall did not disappoint as well; it was long and dry. But what got me excited the most was that it was full of colors. It was a welcome change after a few years of dull foliage.
One of my favorite places for capturing fall foliage is Mont Saint Bruno National Park, located only 15km from Montreal. It is relatively small (9 sq km) but full of small lakes scattered across the area. And do you know what is more exciting for any photographer than a colorful fall forest? The reflections of colorful fall forest in the calm water of lakes.
I try to visit Mont Saint Bruno at least once every fall; this year, it was no exception. I spent the entire day hiking in the park between the lakes, searching for the perfect reflections.
And it became a tradition for me to take one more photo of the small pedestrian stone bridge surrounded by an explosion of colors.

Shooting
This year’s main challenge was to find the spot unobstructed by tall bushes and tree branches. Since I could not find the ideal spot, I decided to take a wider shot of the scene to crop it later in Lightroom and remove unwanted obstructions in Photoshop.
Before taking the shot, I could see that the light was very dynamic with the bright sky in the background and dark water in the foreground. Since I was not quite sure if I needed to bracket my shots or not, I activated the histogram in the viewfinder of my Fuji XT2 and made sure I could capture the entire range of light in one shot.
Below is a Histogram from Lightroom. As you can see, the histogram is very wide, but the highlights and shadows are not clipped.


Editing & Processing
It was a single RAW processing workflow.
I used my updated and restructured Fall Colors preset collection to process the featured photo.
If you already own the Fall Colors Preset Collection, you can download the new version at no charge. You can log in to the member’s area here.
Lightroom (50%) – 15min
Step #1 – Cropping
As usual, I started the editing process by addressing the composition. I used the Crop Overlay tool to make composition tighter. My initial intention was to change the aspect ratio from 3:2 to a more panoramic 16:9 format. But after experimenting, I decided to keep the original aspect ratio.

Step #2 – Lightroom Rapid Editing
Next, I moved to my standard preset-based workflow, Lightroom Rapid Editing.
I opened the Fall Colors Preset Collection and experimented with different looks to find the most appealing one.
Here are 10 different looks I managed to produce:


I decided to use the Open Sky preset as a foundation for my editing.
Below, you can find the screenshot of the new, updated structure of the Fall Colors preset collection.

Now, each preset has 4 additional variations: Warmer, Cooler, Zappy, and Pale.
For example, I used the Open Sky Cooler variation for my editing. When I selected the Open Sky Cooler preset, I got an additional editing option inside the BASIC panel.

With the help of the AMOUNT slider, you can dial up or dial down the “cooling” effect.
In my case, I used the Open Sky Cooler at 44%.
Next, I opened the TOOLKIT and applied the following adjustments:
01. Exposure +
10. Open Shadows ++++
32. Vignetting ++
44. Midtone Contrast +++
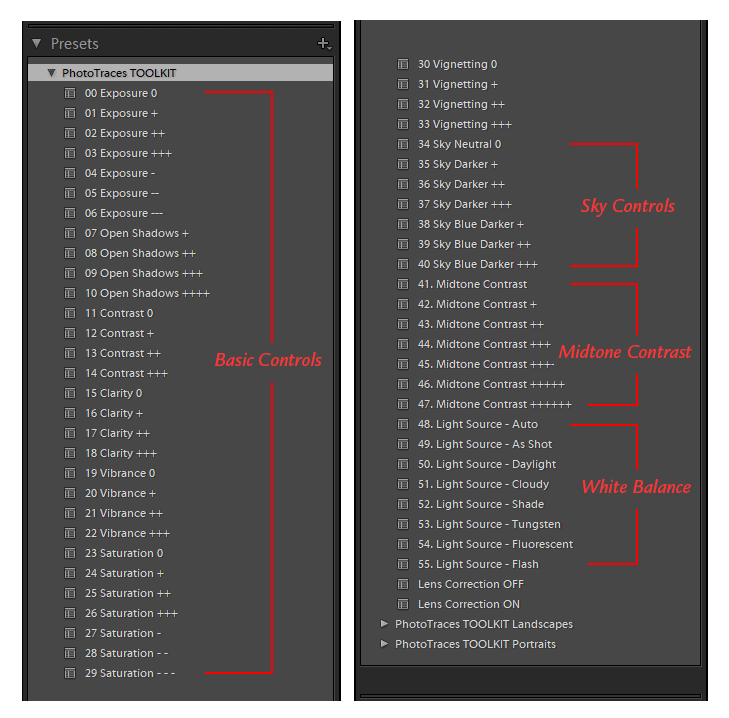
The Editing Formula: Open Sky Cooler 44 (1, 10, 32, 44)
Photoshop (50%) – 15min
Step #4 – Cleaning
It took me some time to remove distractions in the form of tree branches, bushes, and leaves. I used the combination of the Clone Stamp and Spot Healing Brush tools.
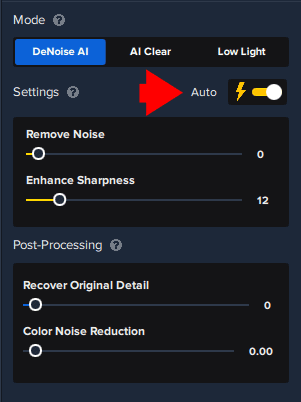
Step #5 – Noise Removal & Sharpening
Typically, you need 2 different tools to remove noise and another to increase sharpness, but with the release of a brand new Topaz DeNoise plugin, you can complete both tasks in one step. I used the AUTO settings, and the plugin reduced the noise and increased sharpness in one step. Priceless.
To learn more about how I use Topuz Plugins in my photography, check here: Topaz Software Review – How I use Topaz Plugins
Before & After Transformation
The fall season offers a multitude of opportunities for capturing stunning foliage photos. By following these 12 ideas and tips, you can enhance your photography skills and capture the beauty of autumn in all its glory.

“Fall Colors”
Lightroom Preset Bundle
Lightroom workflow bundle includes Look Presets, Adjustment Presets, Opacity Presets, Reset Presets, Editing Formulas..