If you want to learn how to rotate crop in Lightroom, you’ve come to the right place. Because in this article, I will show you how to achieve it in 3 different ways.
The easiest way to rotate Crop in Lightroom is to use the keyboard shortcut “X.” First, press the “R” key to jump to the Develop module and activate the Crop Overlay tool. Next, use the shortcut “X” to switch between Landscape and Portrait crop orientation.

Reasons for Changing Photo Orientation
In my photography, I change photo orientation for two main reasons.
Reason One: Improving Composition.
As a travel and landscape photographer, I take 90% of my photos in landscape orientation. In some cases, I might shoot a series of images in portrait orientation and assemble them in Lightroom into a panorama. But the final photo is virtually always a landscape.
In other situations, when I like the subject of my photo but am not happy with the composition, I always use the Crop Overlay tool intending to improve the aesthetics. In such cases, I often try modifying the image to see if I can find an interesting unintended crop in a different aspect ratio and orientation.

Reason Two: Social Media
But even when I am happy with my final photo in landscape orientation, I still need to create a portrait version if I want to post it on Pinterest.
Often, it is not easy to come up with meaningful compositions in both landscape and portrait orientations for the same photo, but I like the challenge. It makes my brain work harder.

How to Rotate Crop in Lightroom
When you start learning Lightroom and want to change image crop orientation, it is not obvious how to approach the task. The first reaction is always the same for everybody. You move the mouse over the corner of the image to activate the ROTATE function to pivot the crop, but you immediately realize that it does not work. The rotation function in the Crop Overlay panel rotates the photograph only and leaves the crop selection unchanged.

You recognize the need for a different approach.
Here are the three right ways to rotate crop in Lightroom between Landscape and Portrait orientations.
1. Use the Keyboard Shortcuts
In Lightroom, there are 3 types of keyboard shortcuts.
The first type of shortcuts works only in specific tools and panels.
The second type works in specific modules, Develop Module or Library Module, for example.
And finally, there are global shortcuts that work in every module.
To access the Crop Overlay panel, you use the global shortcut “R.” It is one of the most helpful and used commands in my Lightroom workflow. No matter in what module I am, I simply hit the “R” key, and Lightroom takes me to the Develop Module, if I am not already there, and activate the Crop Overlay tool in one step.

Next, you need to use the shortcut “X” to switch the crop between Landscape and Portrait orientation.

Please, note, in this instance, the X” shortcut is the Crop Overlay panel specific. If the Crop tool is not active, the X shortcut carries a different function; it will mark the selected image as REJECTED. Be careful.
To summarize:
- Use the shortcut “R” to activate the Crop Overlay tool.
- Use the “X” shortcut to switch between Landscape and Portrait.
2. Manual Crop Rotation with Locked Aspect Ratio
The second approach allows you to change crop orientation manually while preserving the photo’s original aspect ratio.
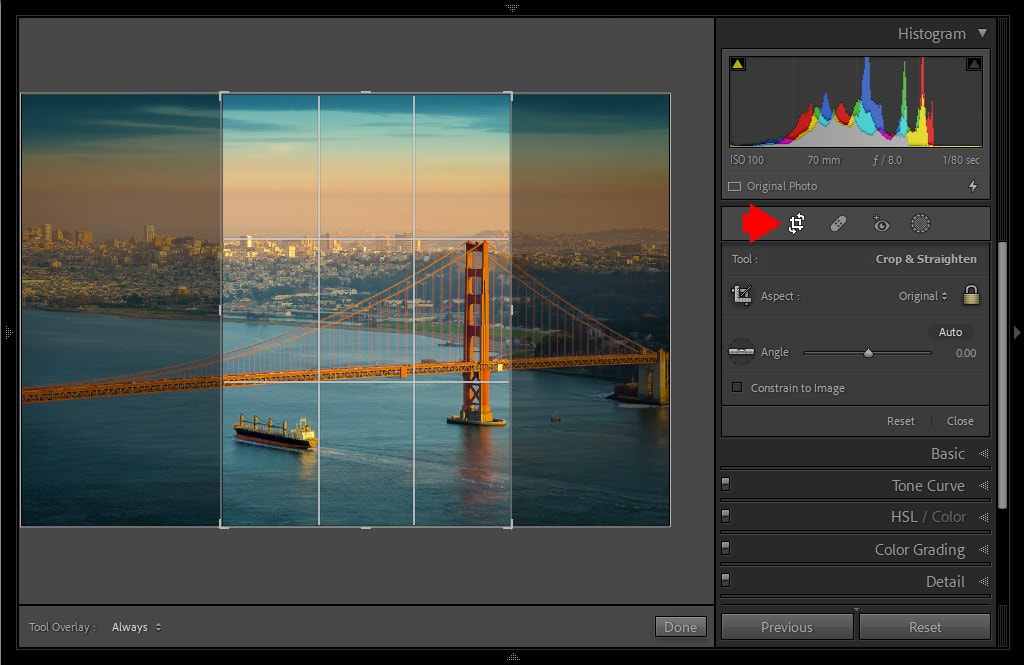
Access the Crop Overlay panel by using the “R” shortcut or by clicking on the newly redesigned icon on the right panel of Lightroom below the Histogram panel.
Make sure to lock the aspect ratio of the crop selection.

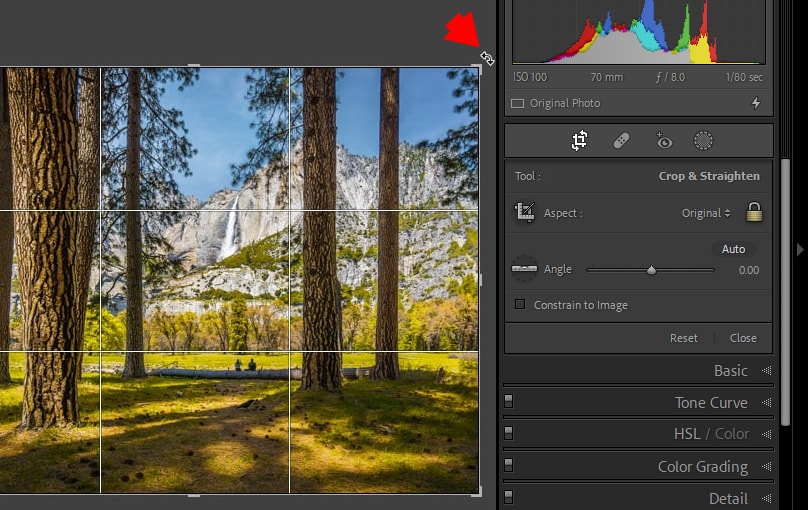
Next, move your mouse over any corner of the image to activate the resize icon.
Finally, press the mouse down and drag it toward the center of the image without releasing the mouse button. Keep dragging until the crop selection changes the orientation by jumping from landscape to portrait.

3. Freestyle Crop Rotation
The final method of changing the crop orientation is an entirely manual one.
Hit the “R” key to activate the Crop Overlay panel.
Unlock the aspect ratio by clicking on the LOCK icon.

Move the mouse over the side of the crop selection until the resizing icon appears.
Now, you can freely drag the left or right side of the crop inwards until you achieve the desired aspect ratio in portrait orientation.

Extra Tip: Use the Lights Off Mode
Use the Lights Off mode to visualize the final image better when working inside the Crop Overlay panel.
Press the keyboard shortcut “L”, and the Lightroom will hide everything except the area of the active cop.
See also: Lightroom Shortcuts Cheatsheet

Don’t forget, to access the Light Off in the Crop Overlay panel, the tool must be active (shortcut “R”).
How to Rotate Crop in Lightroom | Conclusion
As you can see, Lightroom offers us a few different ways to change crop orientation. You probably, do not need to memorize all of them except for the “X” keyboard shortcut. I can promise you will use it again and again.

